Lemon Layer Cake
This lemon layer cake is creamy and soft with a buttery crumb that will leave you with flavours of lemon cheesecake - but all without any dairy!
Servings 12 people
Ingredients
Lemon Cake
- 3 cups plain flour
- 1 tablespoon baking powder
- ½ teaspoon salt
- 1 cup (250 grams) dairy-free spread
- 1 ½ cups sugar
- 4 eggs, room temperature
- 2 teaspoons vanilla
- 1 cup coconut milk
- 1 heaping tablespoon lemon zest (2-3 lemons)
- ⅓ cup lemon juice (2-3 lemons)
Lemon Buttercream Frosting
- 1 cup (250 grams) dairy-free spread
- 6 cups icing sugar
- 2 tablespoons coconut milk
- 1 teaspoon vanilla
- 2 tablespoons lemon juice (1 lemon)
- 1 tablespoon lemon zest (1-2 lemons)
- pinch salt
Instructions
- Preheat oven to 180°C and spray 3, 8 inch round cake pans with cooking oil and line the bottom with baking paper.
- Make the lemon cake. In a bowl, sift flour, baking powder and salt and set aside. In another large bowl, cream dairy-free spread and sugar with a handheld electric mixer or in a stand mixer with a paddle attachment. Add eggs, one at a time beating well in between each, scraping down the sides with a rubber spatula as necessary. Add in vanilla and continue to beat until the batter is light and creamy.
- Add in the dry ingredients ½ cup at a time while beating the mixture on low speed. Alternate adding the dry ingredients with the coconut milk, again in small increments until everything has combined, being careful to stop as soon as everything is mixed in to ensure the batter is not overmixed. Finally, add in lemon juice and and mix through until the batter is smooth and creamy.
- Divide the batter evenly into the 3 prepared cake pans. I like to use my kitchen scales to weigh it out to make sure it is exact. Place in the preheated oven for 25 minutes or until a skewer when inserted comes out clean and cake springs back when lightly touched. It is normal for the cakes to shrink a little and come away from the sides of the pan while cooling.
- Let cakes cool for 10 minutes in the pans before turning out onto a wire rack to cool completely.
- Make the lemon buttercream. Using a handheld mixer or a stand mixer with the paddle attachment fitted, lightly beat the dairy-free spread so it’s smooth. Add in 3 cups of icing sugar. Beat until creamy. Add in another 3 cups of icing sugar and beat on medium. While mixer is running, add in vanilla, lemon juice and milk, one tablespoon at a time until desired consistency is reached. Finally, mix through lemon zest and salt to taste. If mixture is too thin, add more icing sugar ½ cup at a time until frosting is smooth but thick enough to hold its shape.
- Assemble the cake. Level the tops of the cakes with a bread knife if required. Smooth a little buttercream on a cake stand or serving board and place the first layer down. Top with buttercream to cover the top of the cake, then add the next layer. Again add more buttercream, then a cake layer until all three layers have been sandwiched together. Top with more buttercream and smooth out with a cake knife. For the best frosting results, crumb coat the cake by adding a thin layer of frosting around the sides of the cake and scraping away any excess. You should be able to see the cake through the frosting yet still have smooth, straight sides. Let cake chill in the fridge for 4 hours or overnight. I use about half the quantity of frosting for this step, so feel free to make the frosting in two batches or cover any excess frosting and store in the fridge. Allow to soften on the bench when ready to use again.
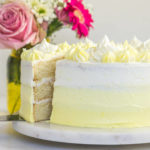
- Remove cake from fridge and finish with another layer of frosting around the sides and the top. I chose to do an ombre style finish by dividing the second half of the frosting into three bowls and tinting one bowl a bright yellow, on a lighter yellow and keeping the third bowl white. I then piped the darkest colour around the bottom of the cake, then the lighter yellow, and finally the white around the top of the cake, before using a metal cake spatula to smooth down the sides, blending the colours together.
- Finish off the cake by piping some swirls around the top and sprinkling over a little extra lemon zest.
Notes
*I use Nuttelex Buttery to replace butter in most of my recipes as it is dairy-free and gives a 'buttery' flavour without being greasy. As this is an Australian product, the closest US alternative I believe is Earth Balance. Otherwise any dairy-free spread will work.
Tip! If you don’t have three cake pans, you can bake the cakes in batches. Leave the cake to cool in the pan for 10 minutes before turning it out onto a wire rack to cool completely. Wash the pan in warm soapy water and rinse with cold. Spray with non-stick spray, line the bottom with baking paper and you are ready to use it again. The remaining cake batter will be fine on the bench in between bakes, just do not leave it out longer than 3 hours.
Not from Australia? Check out my US Conversion Guide.