
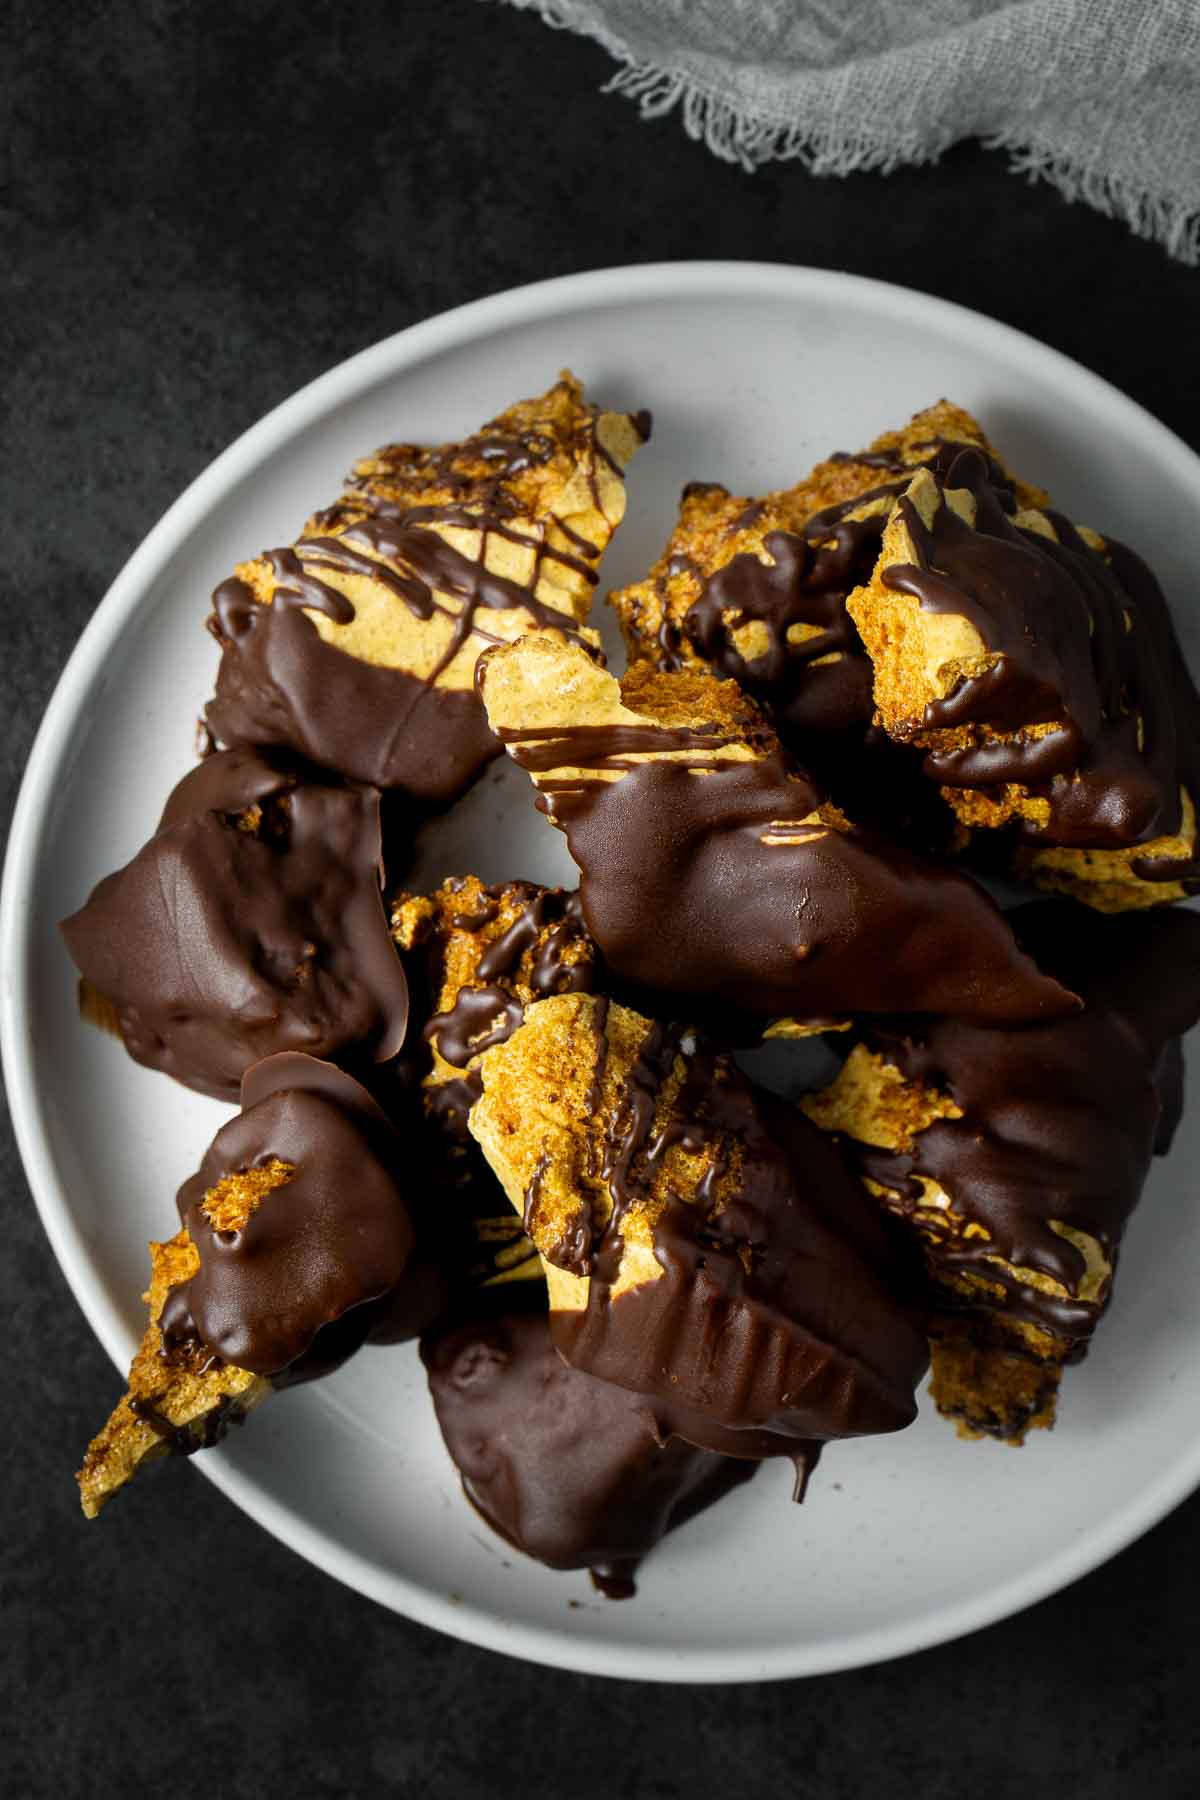
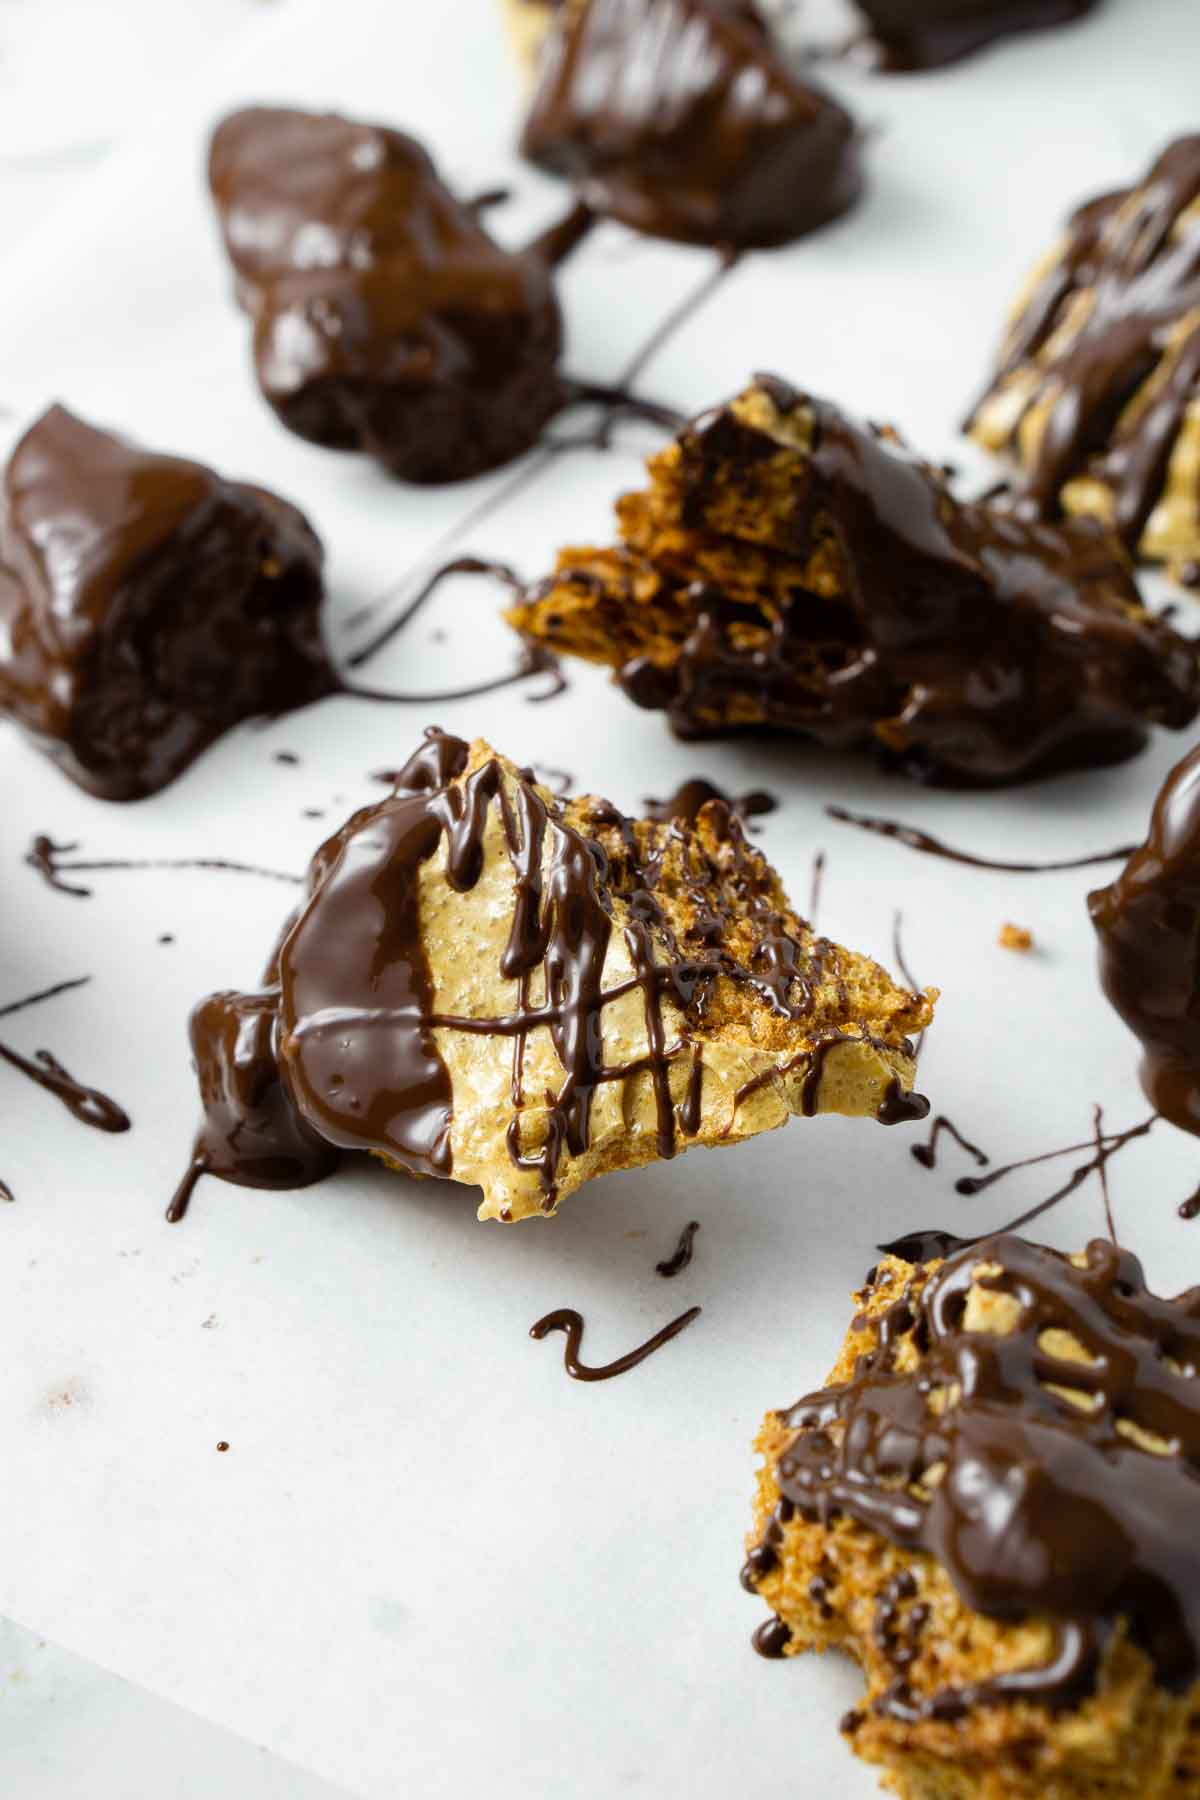
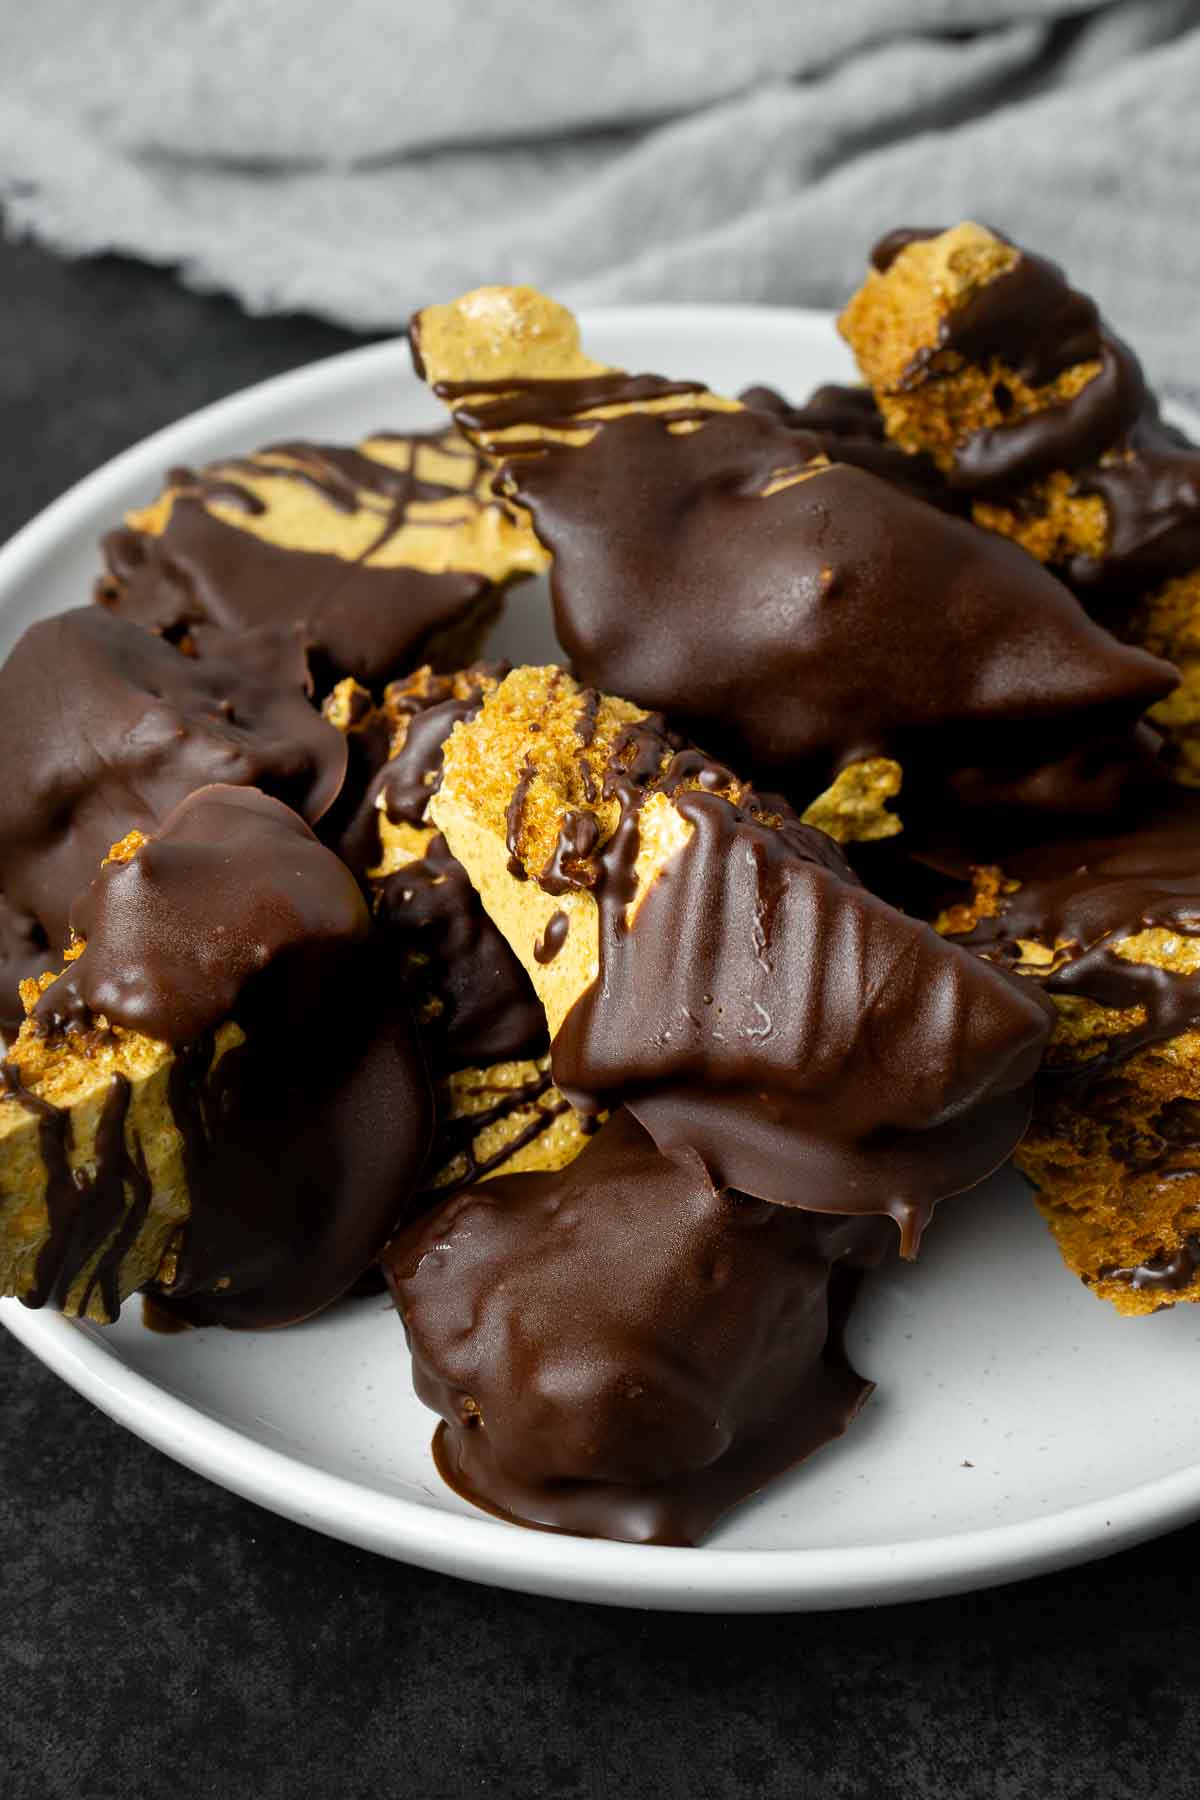
These bites of chocolate coated honeycomb are so easy to make at home. They make great gifts and are dairy-free, gluten free and vegan making them a treat that everyone can enjoy!
Do you remember violet crumble bars? I used to love them as a kid, they were my absolute favourite of the chocolate bars. Rich chocolate coating a light and crunchy honeycomb. It just feels satisfying to bite into!
Since I no longer eat dairy though, that milk chocolate coating is off limits so it’s a treat I no longer get to enjoy. Until I decided to make my own chocolate coated honeycomb using a dairy-free dark chocolate!
It’s really easy to make your own version at home and it is so delicious. I can admit that by the time I finished shooting the images for this post, most of it was gone. The rest didn’t last the rest of the day. This sweet treat is definitely a weakness of ours!
I highly recommend making them as a gift this holiday season – that is if you can manage to not eat them all yourself.
If you haven’t had honeycomb before, firstly, you’re missing out, secondly it’s basically an air-rated toffee flavoured candy. It’s defined by its big bubbly air pockets and has a toffee/caramel taste and its light, crisp and crunchy.
Honeycomb goes by many names, often called hokey pokey instead, while violet crumble or crunchie bars are the most popular versions of chocolate covered honeycomb you can buy.
Key Ingredients
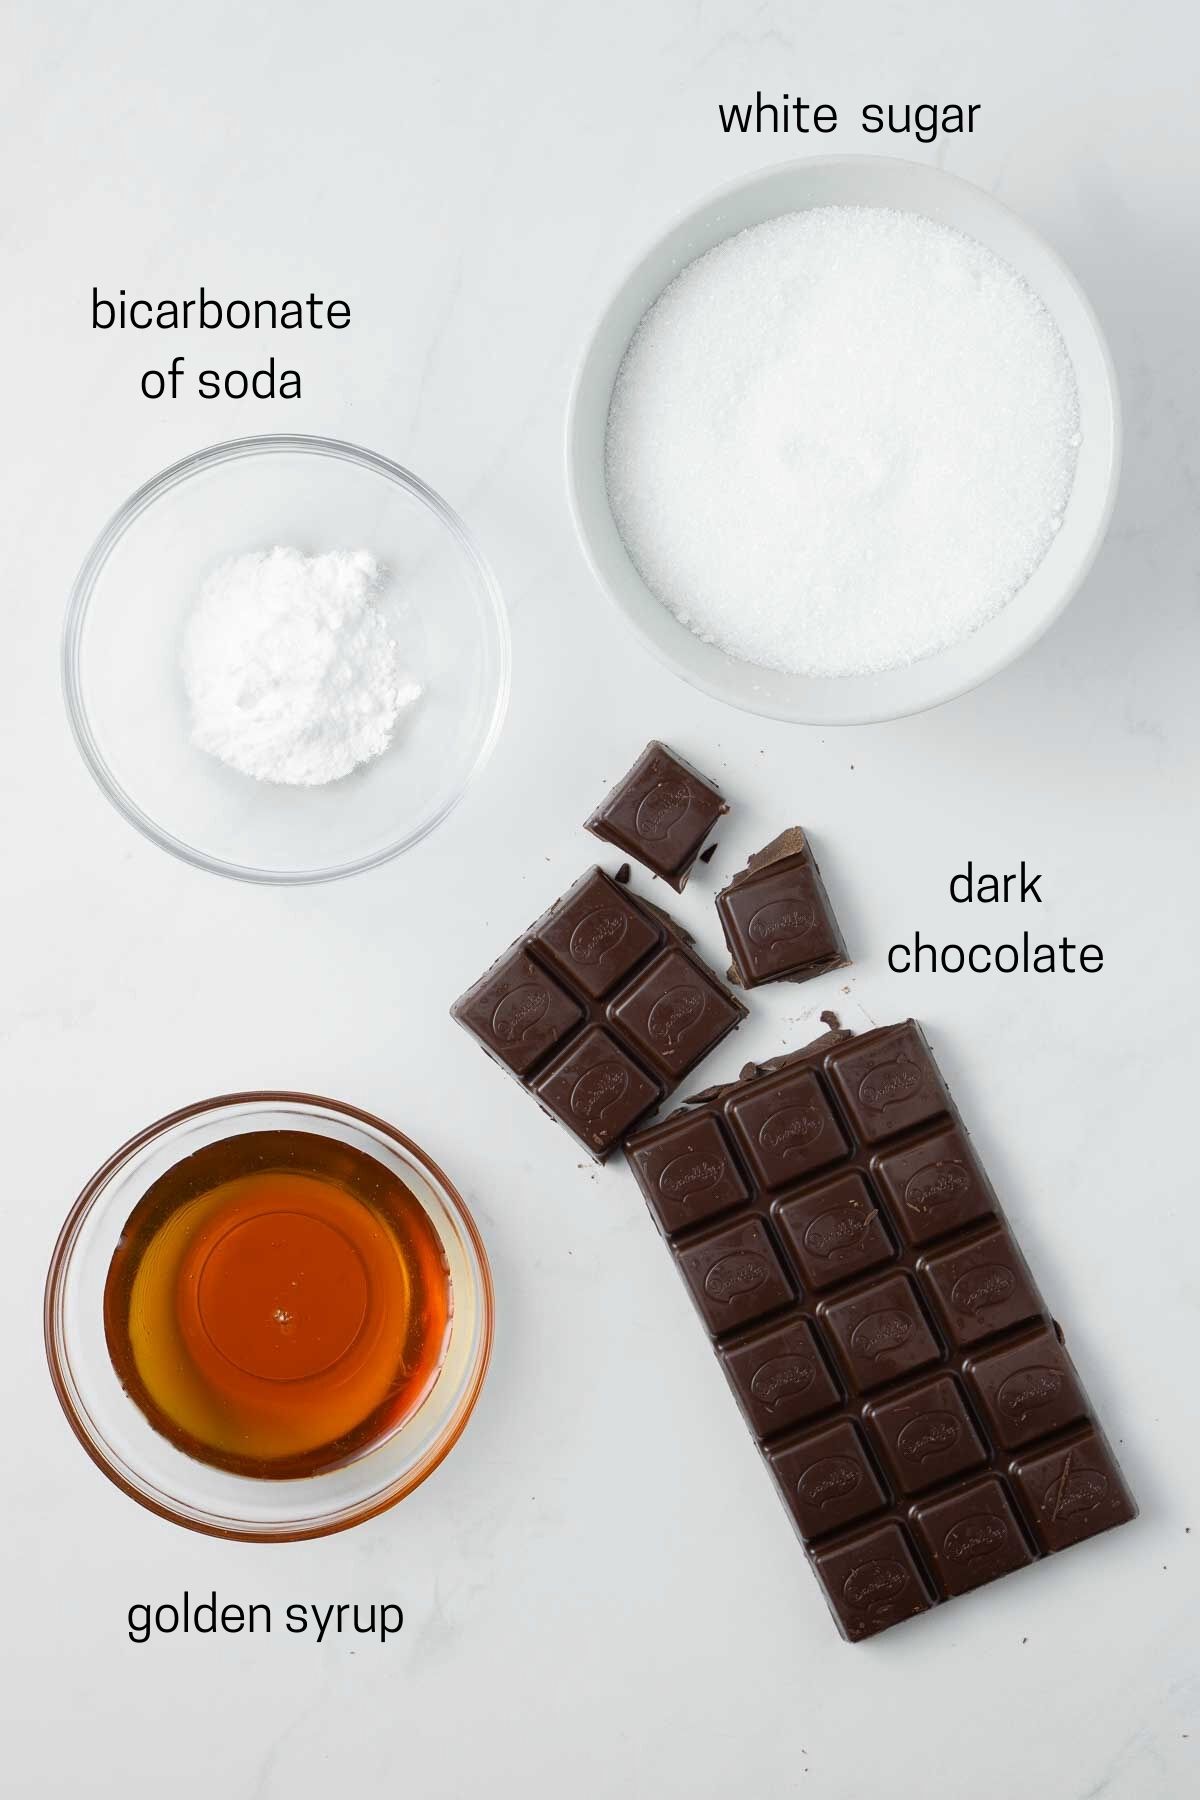
To make honeycomb you only need 3 ingredients, plus the chocolate to coat it in.
Note all ingredients and their quantities are laid out in the recipe card at the bottom of this post.
- Sugar – plain white sugar is going to be melted into a toffee/caramel to give us the base of our candy.
- Golden syrup – this gives the honeycomb its signature flavour. Make sure to use the one out of the jar/tin not the squeeze bottle as I’ve had inconsistent results with the squeeze type in my testing.
- Bicarbonate of soda – also known as baking soda (and definitely not baking powder), this is the key to creating the aeration and giving that distinct texture.
- Chocolate – use your favourite, I love a good quality 70% dark to keep dairy-free but any will work.
Step-By-Step Instructions
To make honeycomb at home, you’ll need a small saucepan with tallish sides, a wooden spoon and a baking tray lined with baking paper. It’s essential that you get the tray ready before you start making the honeycomb – you’ll see why.
Start by adding the sugar and golden syrup to the saucepan and heating on medium/low heat until the sugar has completely dissolved. Stir regularly with a wooden spoon.
Once the sugar is dissolved, turn up the heat and allow the mixture to come to a boil. You want a steady rise of bubbles here, rather than a rapid boil so adjust your heat as necessary to get the temperature just right.
At this point, don’t walk away! You need to watch the caramel as it bubbles for about 5 minutes until it becomes a dark amber color.
Now the fun bit!
Take the pan off the heat and and add in the bicarbonate of soda and start mixing immediately with your wooden spoon. The mixture will foam up and rise and you want to pour it immediately into the prepared tray while it’s still light and fluffy.
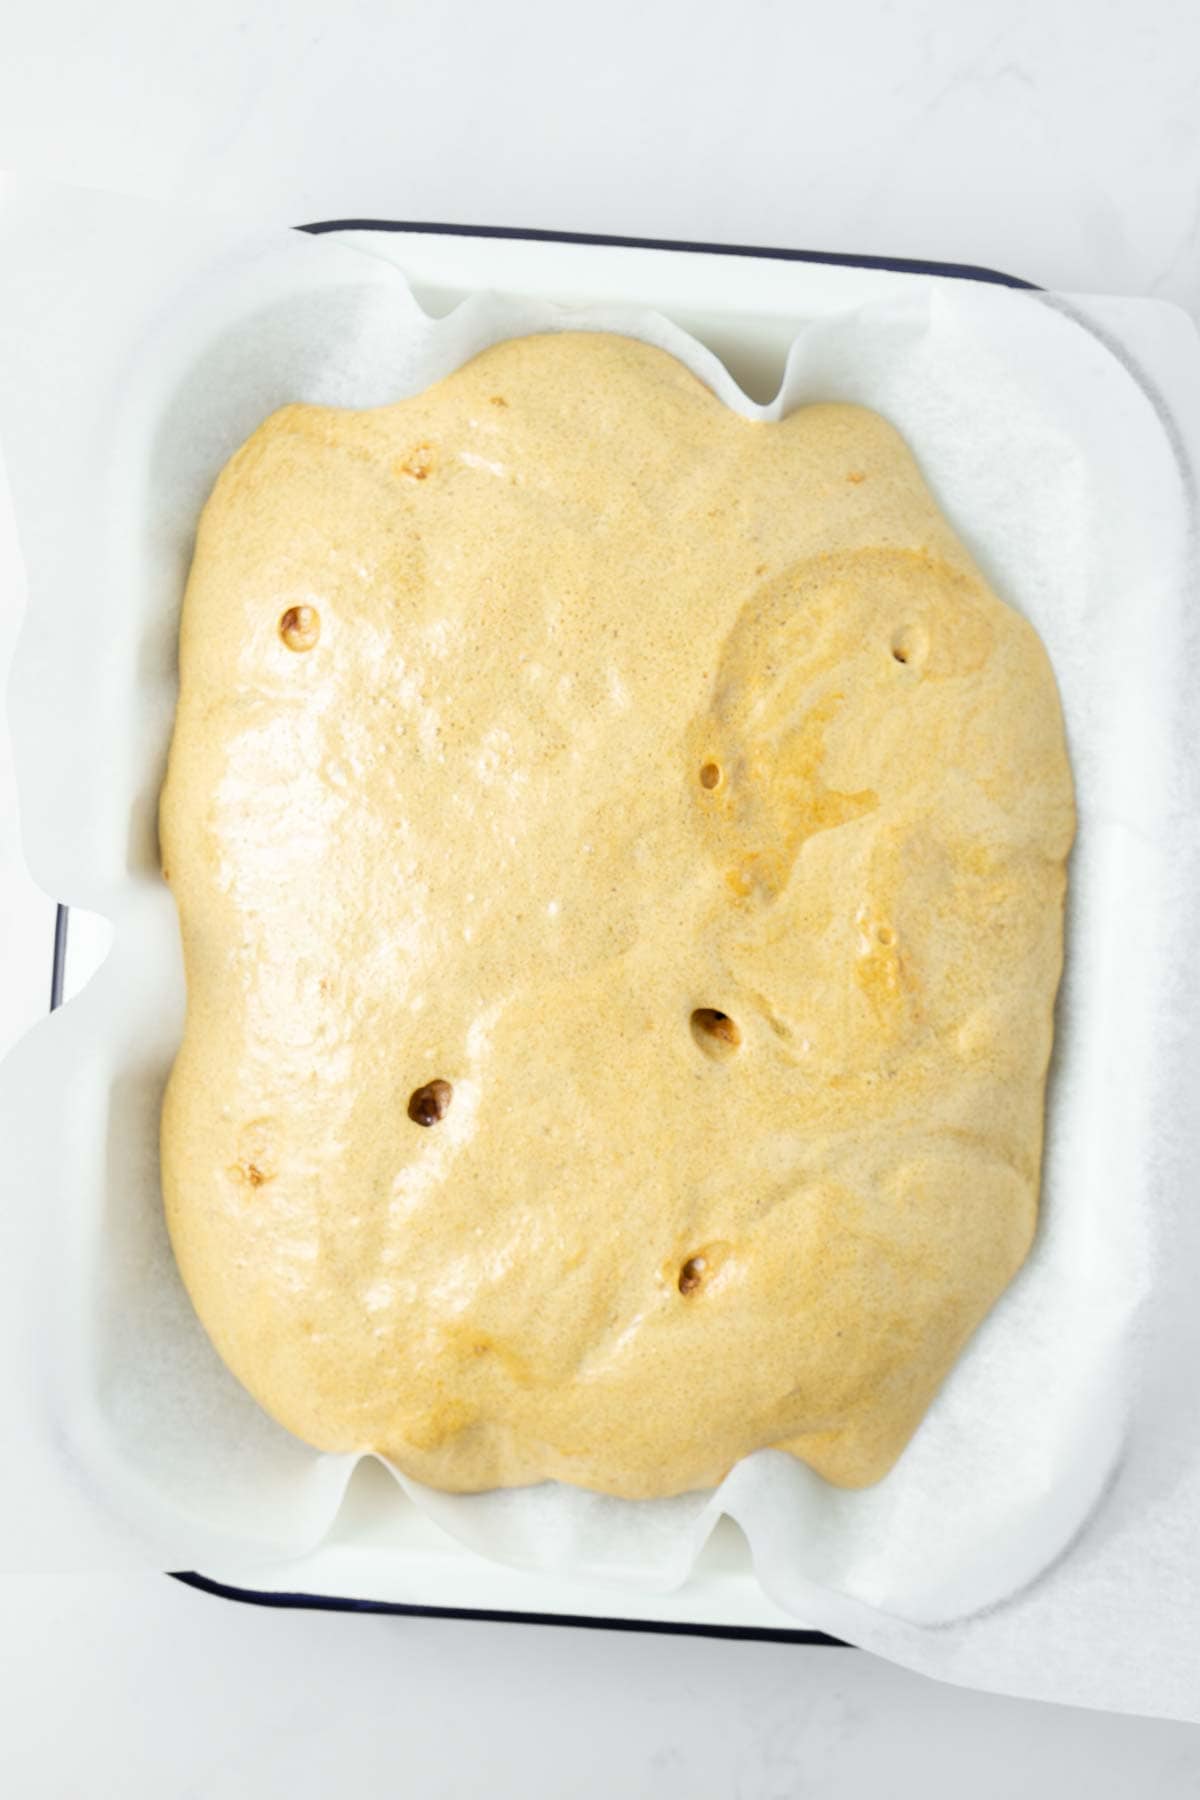
Also quick disclosure, this mixture is hot! Be careful when handling.
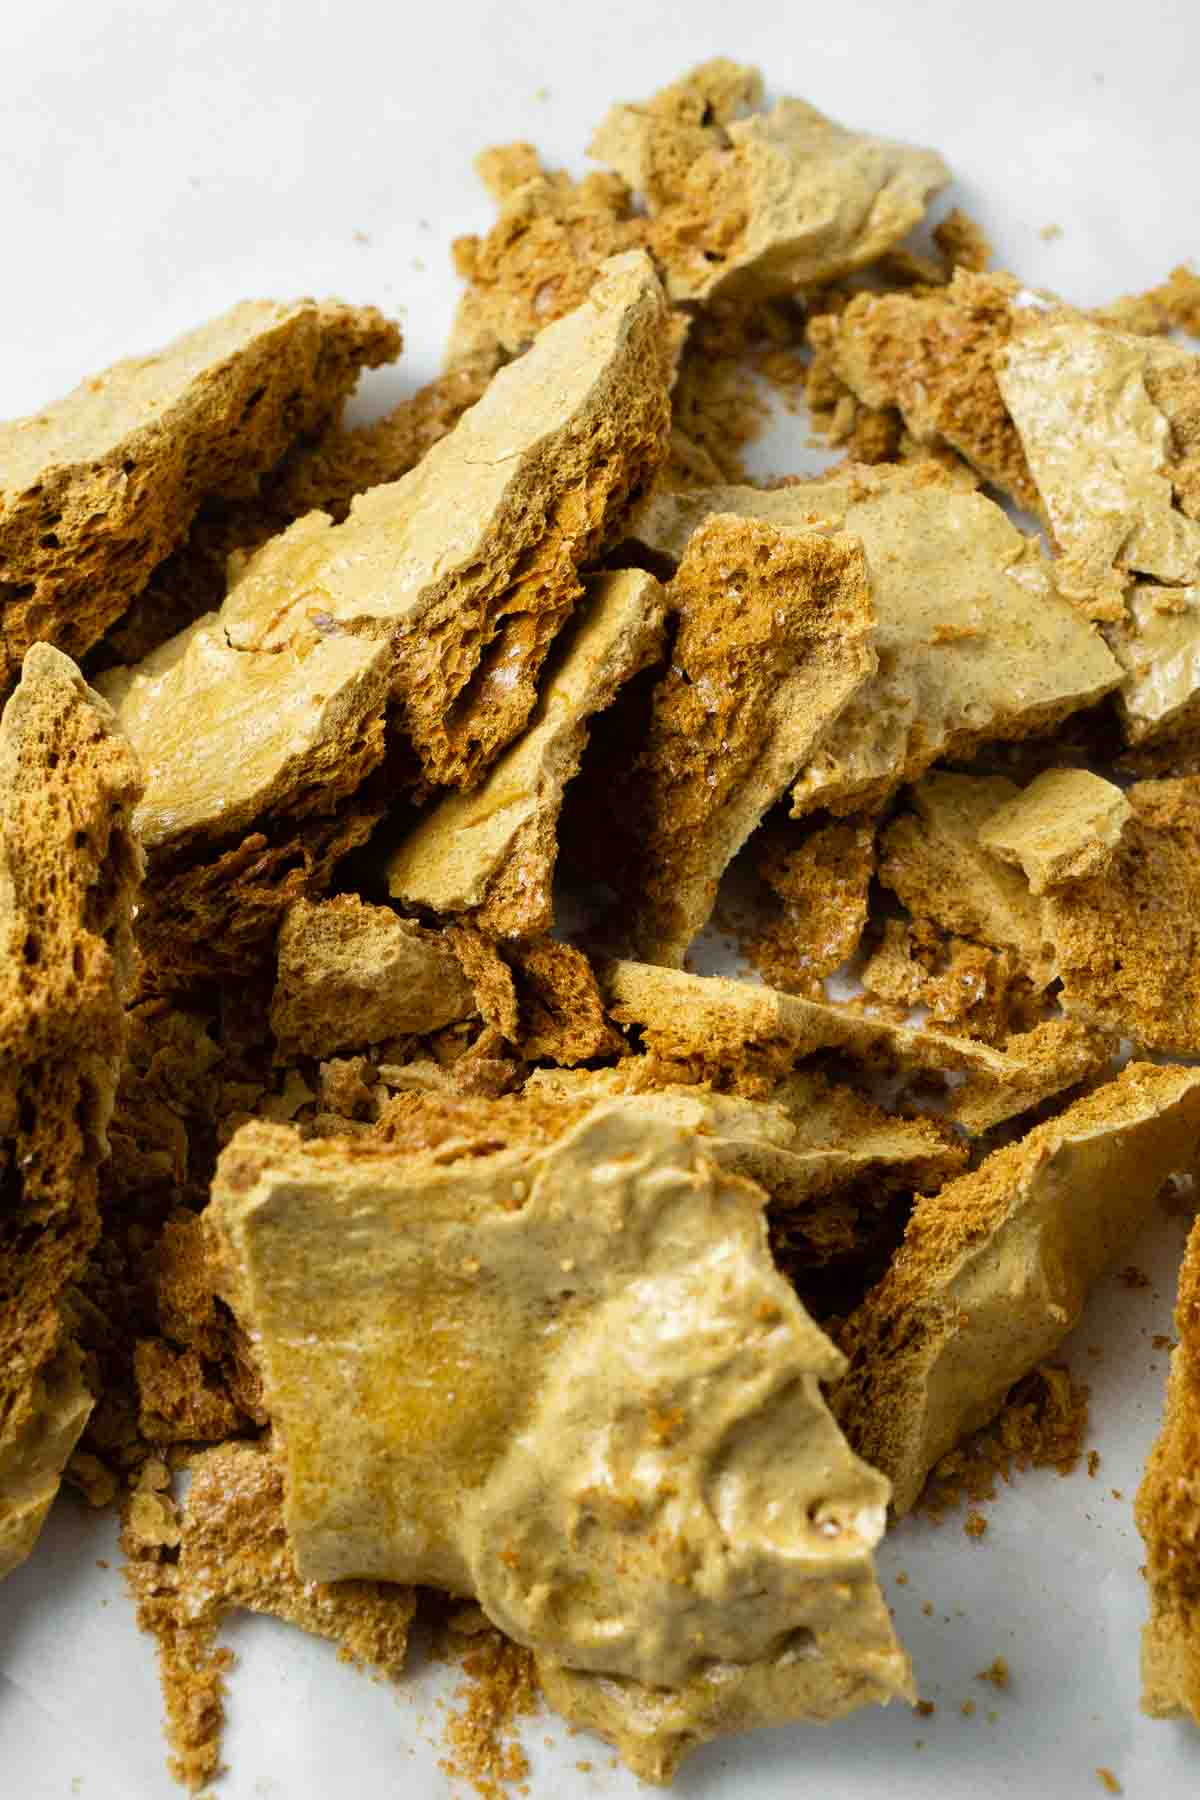
The mixture will still rise and foam on the pan until it settles. You’ll want to leave it to cool completely before touching it.
Once cooled, you can use a knife, but I like to just gently break the honeycomb up into pieces using my hands as it will be brittle and easily break apart.
Break up the dark chocolate into a small bowl and place in the microwave in 20 second intervals, mixing well between each with a metal spoon until the chocolate is completely melted and silky smooth.
Dunk the pieces of broken honeycomb into the melted chocolate and set aside on a plate or tray to set.
Recipe FAQs
This is the most common mistake when making homemade honeycomb. Quite simply, the caramel went too far and burnt leaving that unpleasant taste. You’ll need to start again and be careful to watch the sugar and make sure that you take it off the heat before it gets too dark in colour.
I love this honeycomb just on it’s own, but it can also be used in a range of different desserts. It’s so good crumbled over some ice cream, or for something a bit more spectacular, why not try this chocolate honeycomb layer cake.
You can store the honeycomb in a cool spot in an airtight container, otherwise the fridge is the best place to ensure the chocolate doesn’t melt. Honeycomb will last a couple of days but honestly, never really lasts that long!
If you do make this recipe, please be sure to leave a comment and ⭐⭐⭐⭐⭐ rating below! And tag any of your creations on Instagram with @eightforestlane as I would love to see.
More edible gift ideas:
Rum Balls (Dairy-Free)
Vegan Cinnamon Sugar Cookies
Classic Ginger Snap Biscuits
Vegan Gingerbread Men

Chocolate Coated Honeycomb
Ingredients
- 1 cup sugar
- ¼ cup golden syrup
- 2 teaspoons bicarbonate of soda/baking soda
- 100 grams dark chocolate
Instructions
- Line a baking pan with baking paper and set aside next to your stove top.
- In a small saucepan place sugar and golden syrup and heat on medium until sugar has dissolved, stirring regularly with a wooden spoon. Once sugar is dissolved, turn up the heat and allow the mixture to start boiling. You want it to be a steady rise of bubbles rather than rapidly so adjust temperature as necessary.
- Watch the caramel mixture as bubbles for about 5 minutes until it becomes a dark amber colour.
- Take the pan off heat and add in bicarbonate soda, stirring rapidly with a wooden spoon and pour mixture immediately onto the prepared pan. Set aside for 30 minutes to cool.
- Once completely cooled, break apart.
- Break up the dark chocolate into a small bowl and place in the microwave in 20 second intervals, mixing well between each with a metal spoon until the chocolate is melted.
- Dunk the pieces of honeycomb into the chocolate and sit aside on a tray lined with baking paper until the chocolate is set completely. Store in an airtight container in a cool place, or the fridge.
Nutrition
Nutritional information is provided as a guide only and is calculated using automated online tools, therefore we cannot guarantee the accuracy. We encourage you to make your own calculations based on the actual ingredients used in your recipe.


Never wonder what's for dinner again
Get a brand new dairy free meal plan every week, plus members only recipes and the whole of Eight Forest Lane with no ads. The planning is done, you just shop and cook.
Start your 7 day free trial →