
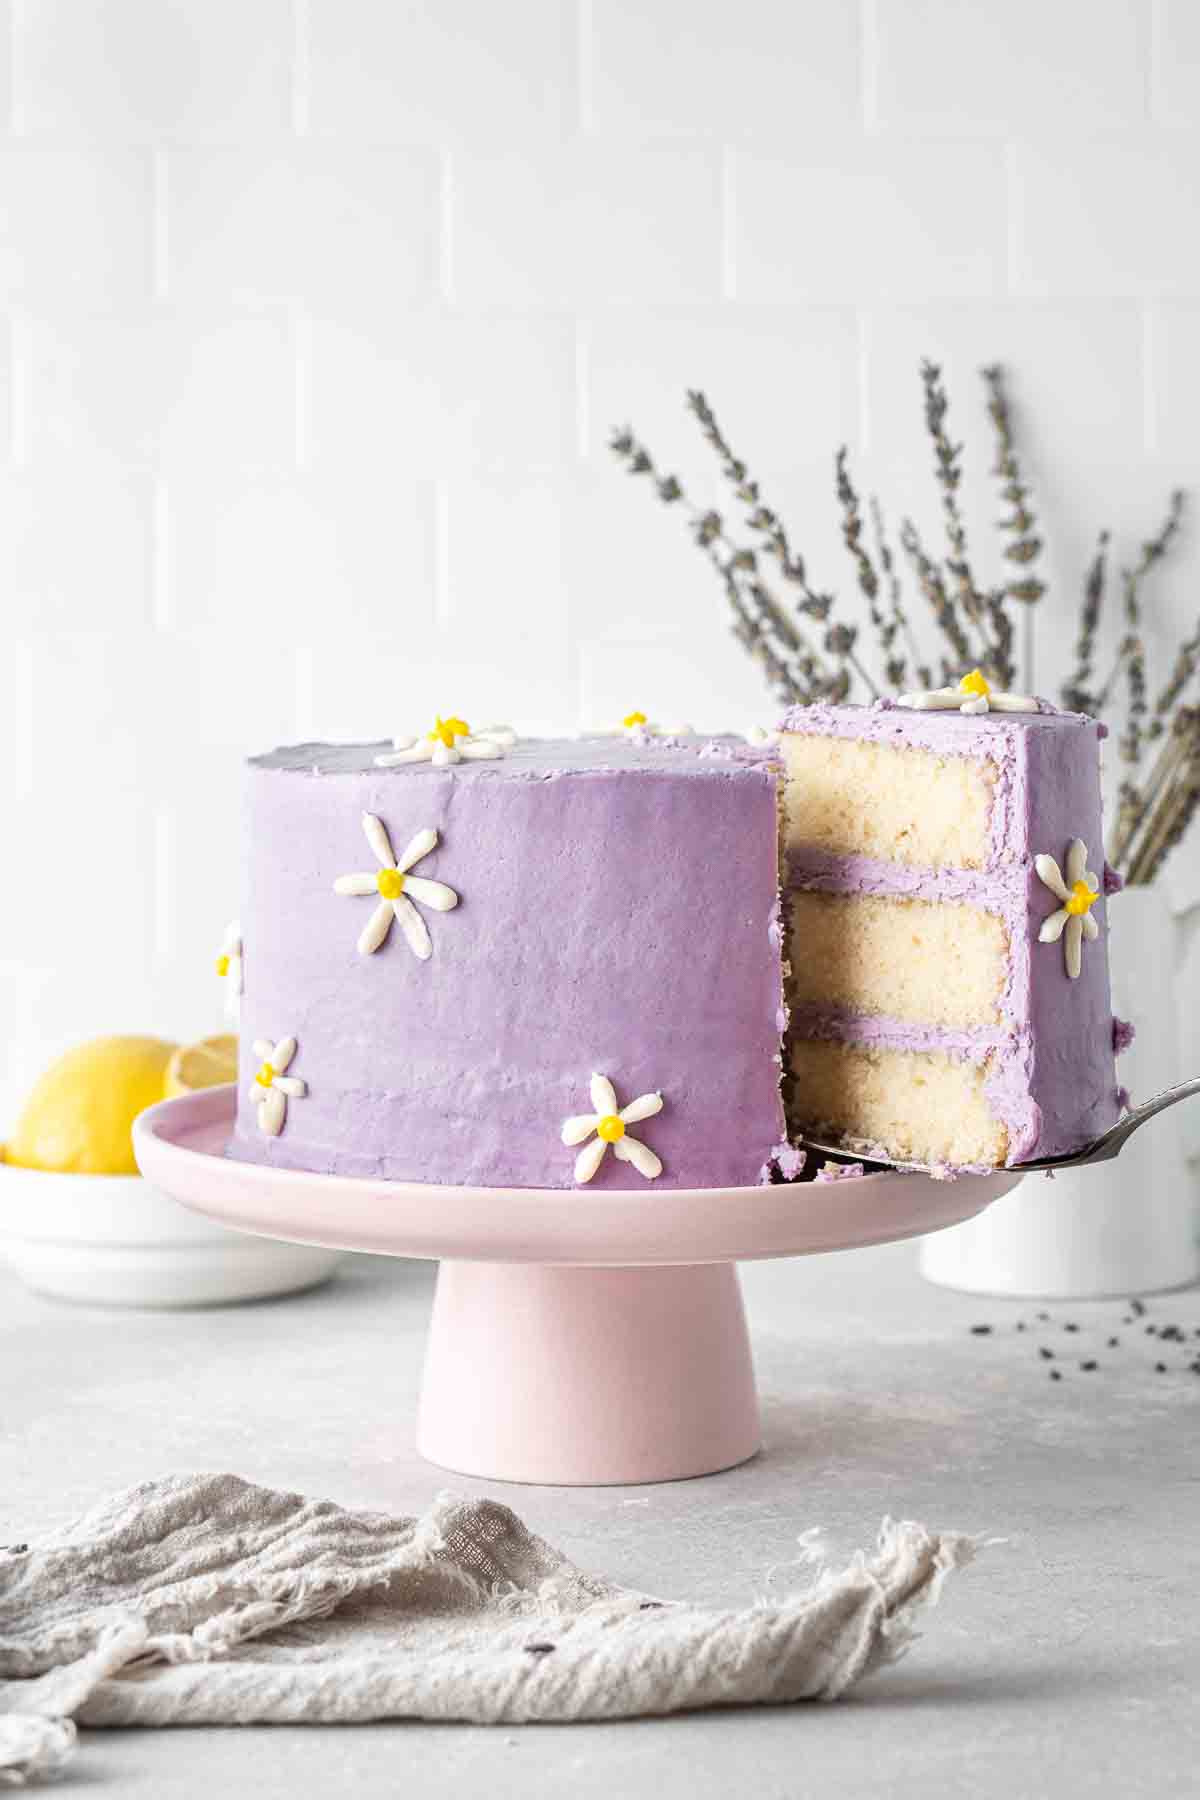
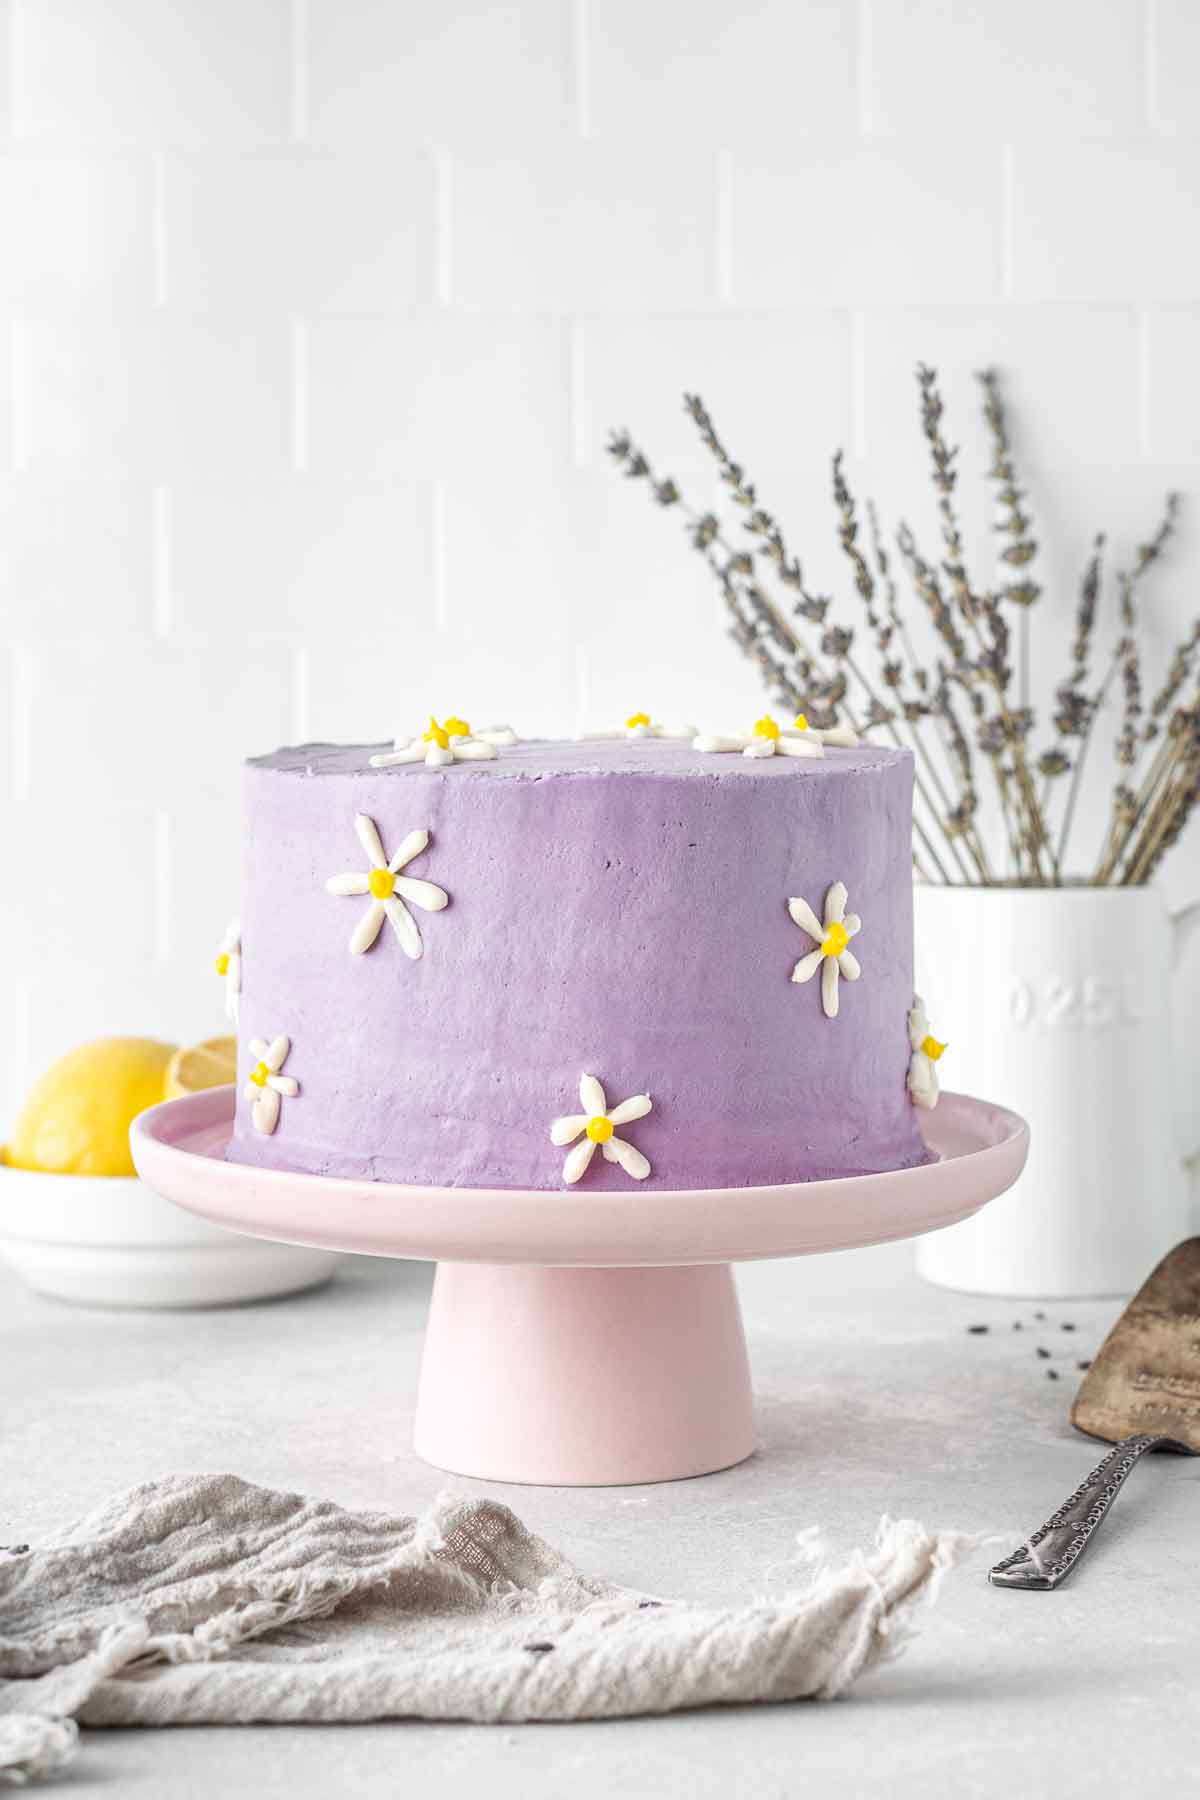
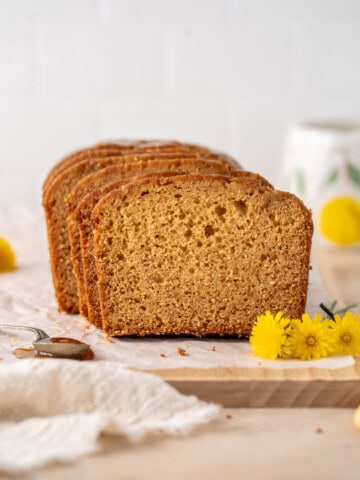
This simple vegan daisy cake makes the perfect birthday cake or centrepiece for Mother’s Day. This 6 inch layer cake is made with a zesty lemon cake and finished with a floral lavender buttercream making it the ideal dairy free cake for spring or to simply bring those warm spring vibes to your event.
Full step-by-step instructions to achieve this design included in this post!
It’s been a long time since I made a layer cake but a recent browse on Pinterest had me falling in love with minimalist birthday cakes and I just couldn’t go past the simplicity of the daisy cake and so I felt inspired and rushed to my kitchen to get baking!
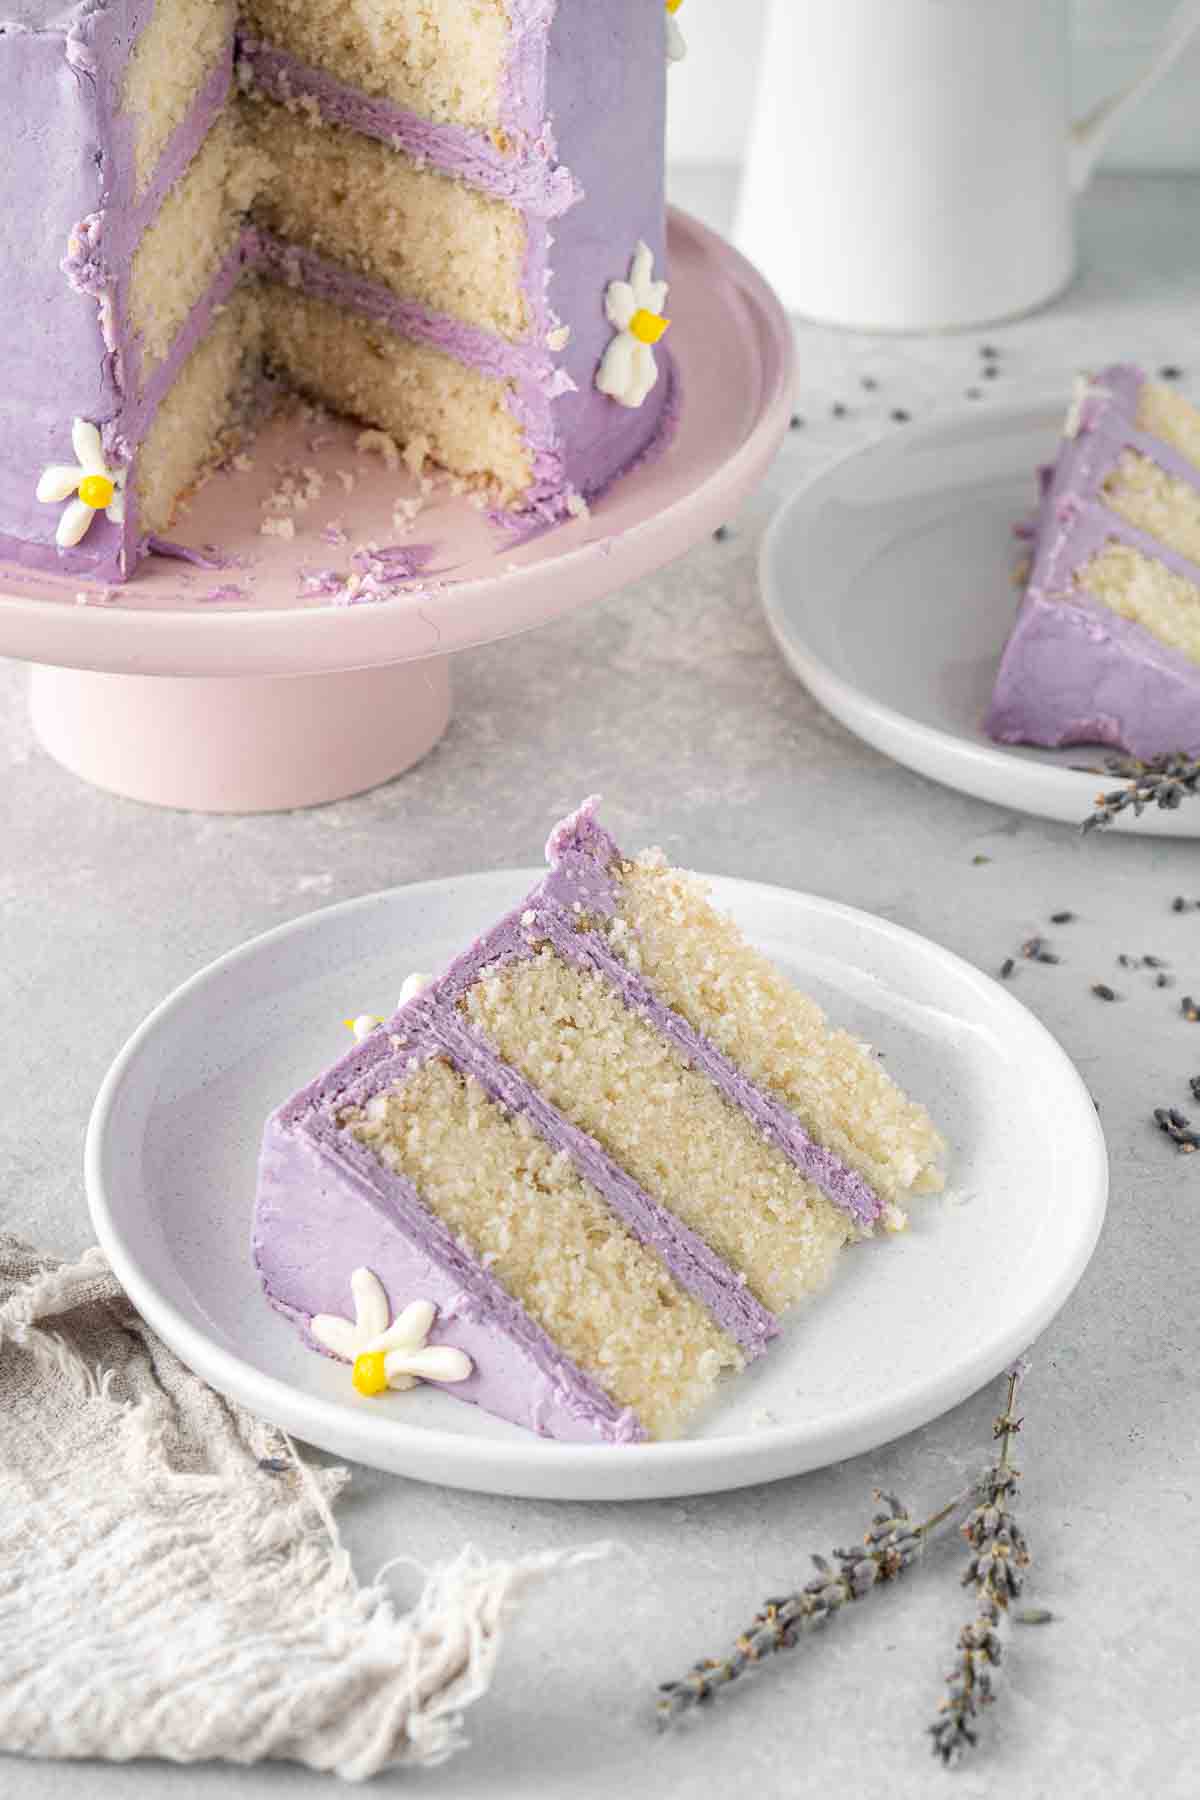
It started with the idea of how I wanted it to look and from there I knew exactly what flavour this cake should be. The cake itself is based on my vegan lemon cupcakes as most cupcake recipes that yield 12-15 cupcakes can easily be converted into 6 inch layer cakes.
As I wanted the frosting to be a beautiful soft purple as the background for my daisies, it only made sense that the flavour should be lavender, so I used my favourite vegan lavender buttercream recipe.
This combination of lavender and lemon is so bright and refreshing and is just what you would expect when biting into a cake covered in flowers I think.
I love making 6 inch cakes as they are much more manageable to work with and also feed a smaller group meaning you’re not left with a lot of leftover cake, but you still get the joy of presenting something that feels extra special for that occasion.
How to make a daisy cake
To make this daisy cake, there are a few steps we need to follow. Each step needs to happen in this order and there is chilling time required in between each step so allow yourself plenty of time.
- Bake cakes and let them cool completely.
- Make the buttercream and assemble and crumb coat the cake.
- Frost a smooth layer of buttercream on the cake.
- Pipe the daisy patterns.
To get started, you’ll also need a few key tools and equipment that is going to make decorating this cake much easier.
- An electric mixer or stand mixer for making the buttercream.
- 3 x 6 inch round baking pans.
- An offset/angled spatula.
- A cake scraper and turntable (very helpful to get that smooth buttercream finish).
- Piping tips: Wilton 104 and Wilton 10.
- Piping bags.
- AmeriColor food colouring gel in violet and yellow (or any food colouring of your choice).
If you do want to purchase any of these products I would appreciate if you did it through my link as I earn a (very) small commission which goes towards continuing to provide free recipes on EFL!
Step-by-step instructions
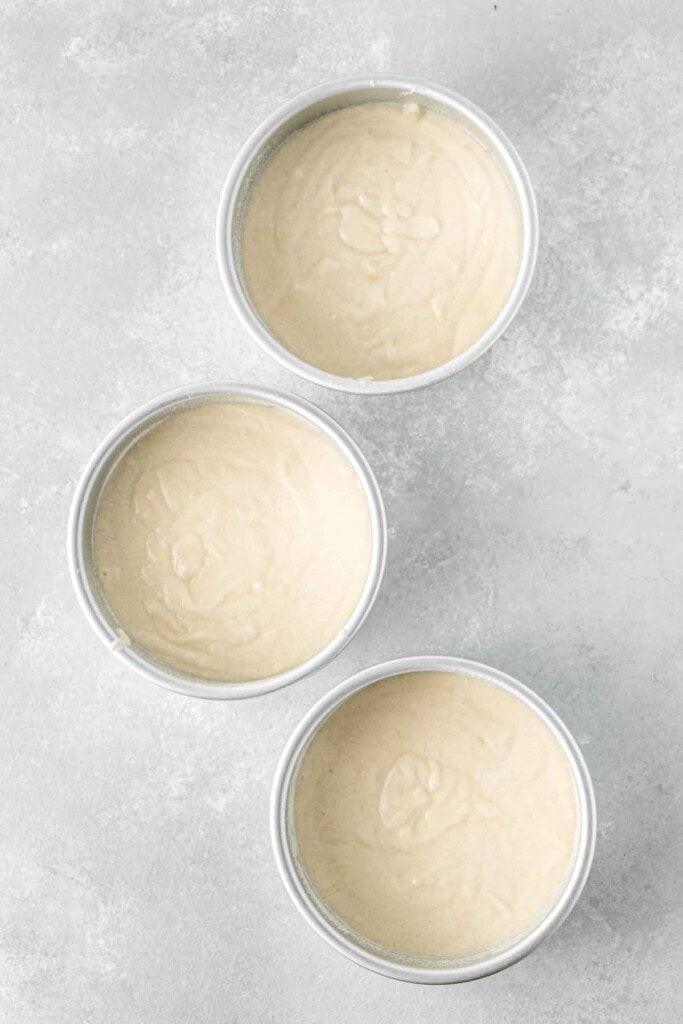
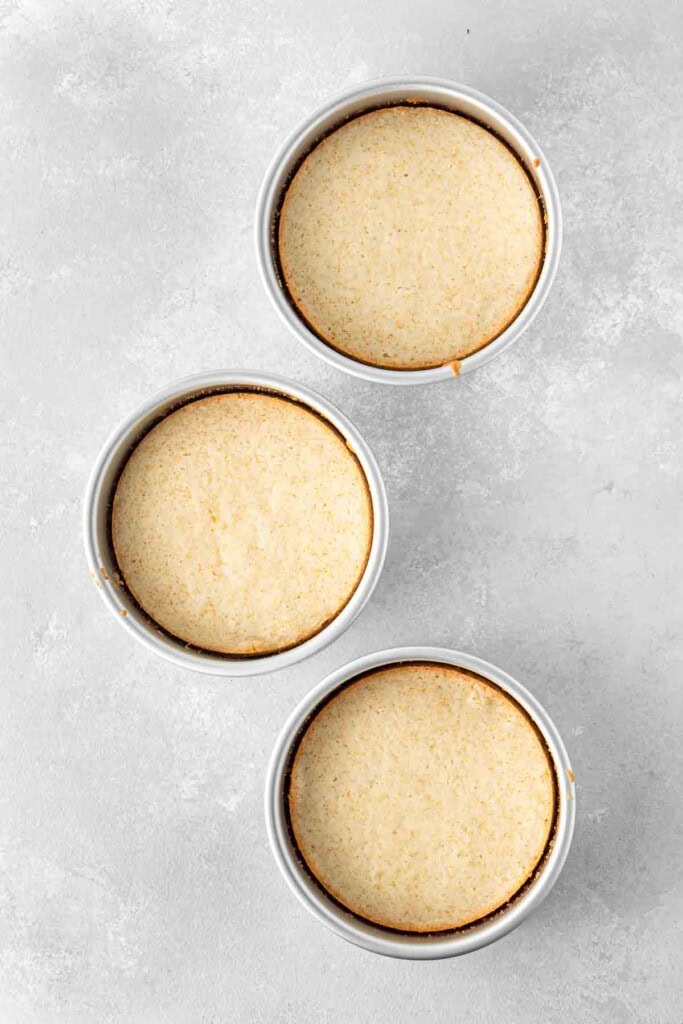
Start by making the vegan lemon cake batter and divide it between three 6 inch round cake pans that have had the base lined with baking paper and greased with a light spray of cooking oil to prevent sticking.
Once the cakes have cooked, allow them to cool for 10 minutes in the pan until they are cool enough to handle and turn out onto a wire rack to cool completely. Once the cakes are cool, place them in the freezer for 30-60 minutes to chill before assembling the cake.
Make the lavender buttercream and BEFORE you add the purple food colouring, remove 1 cup of buttercream and place into a separate bowl. Cover and set aside in the fridge.
I have a full post with all the details on making this vegan lavender buttercream so make sure to read through that as well for more detail.
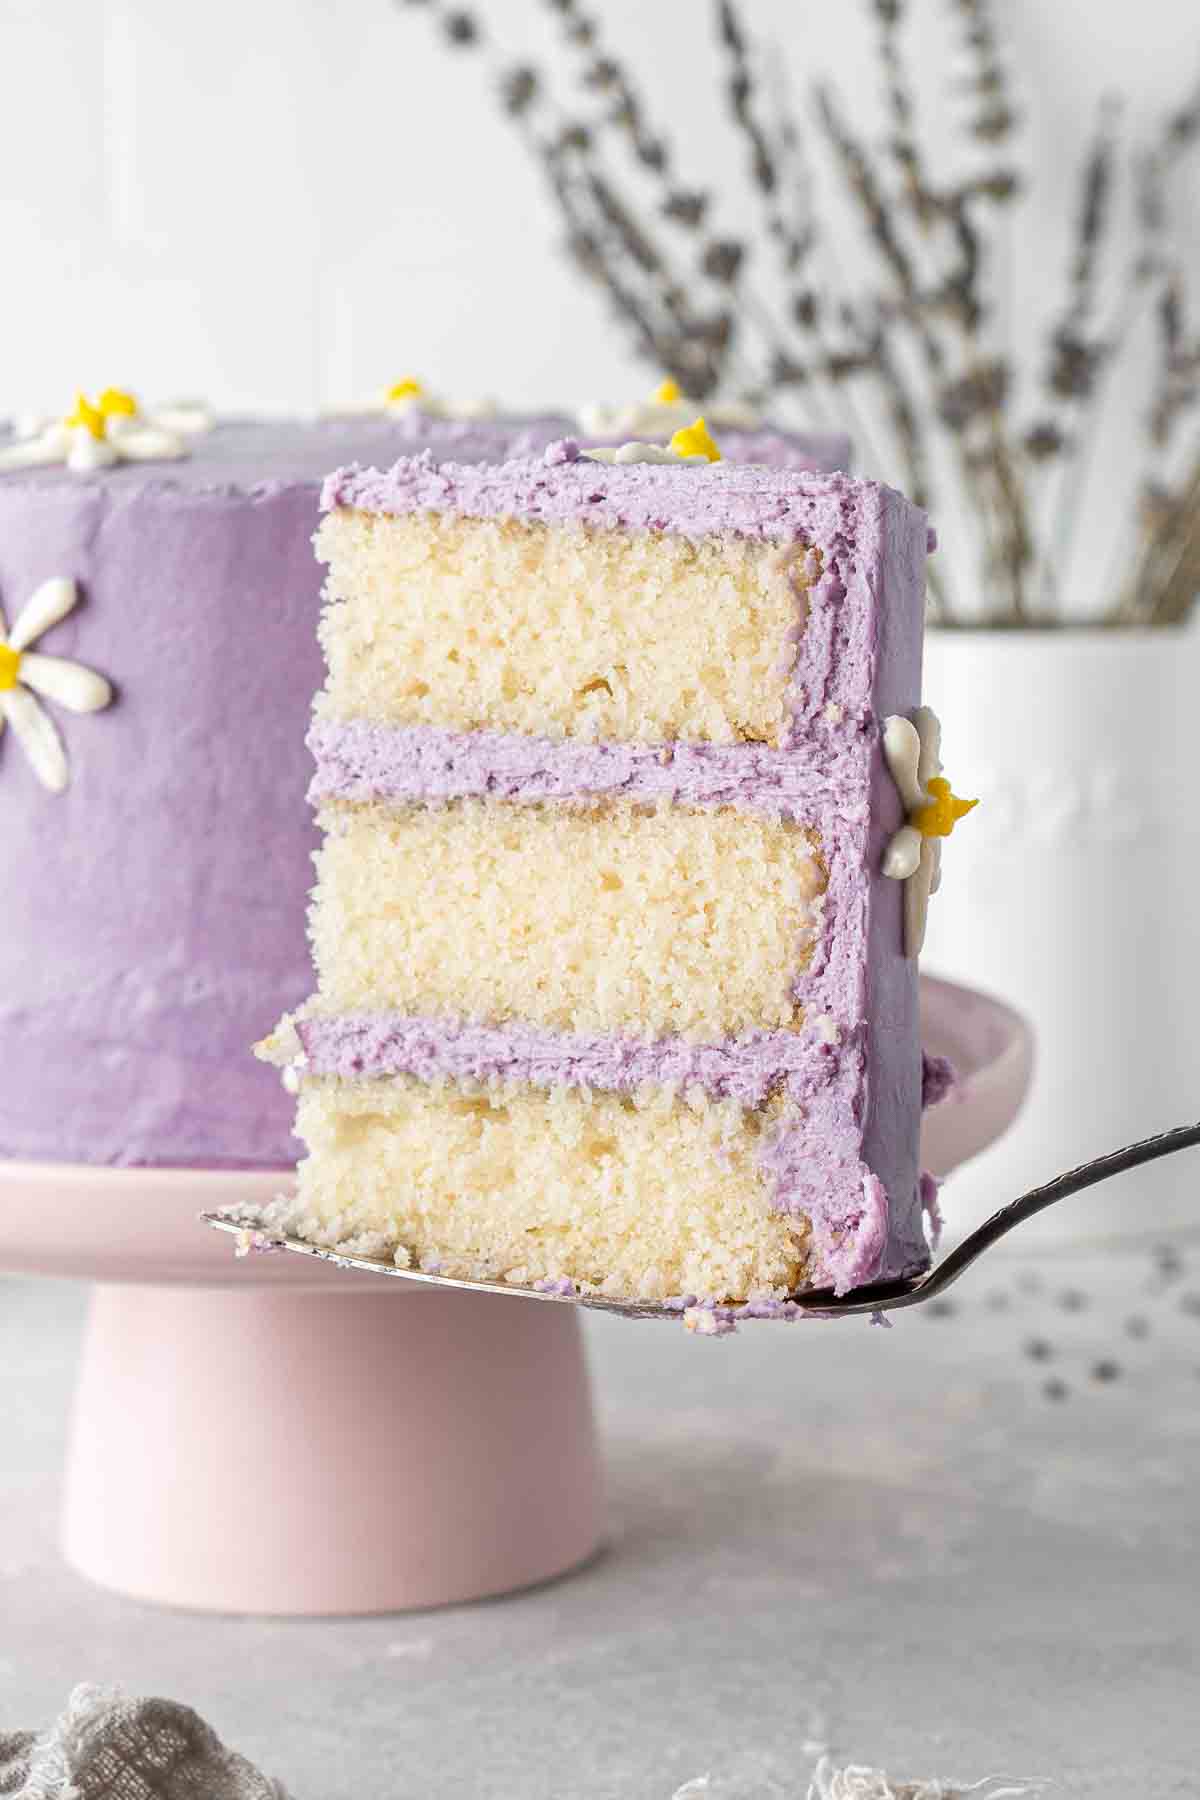
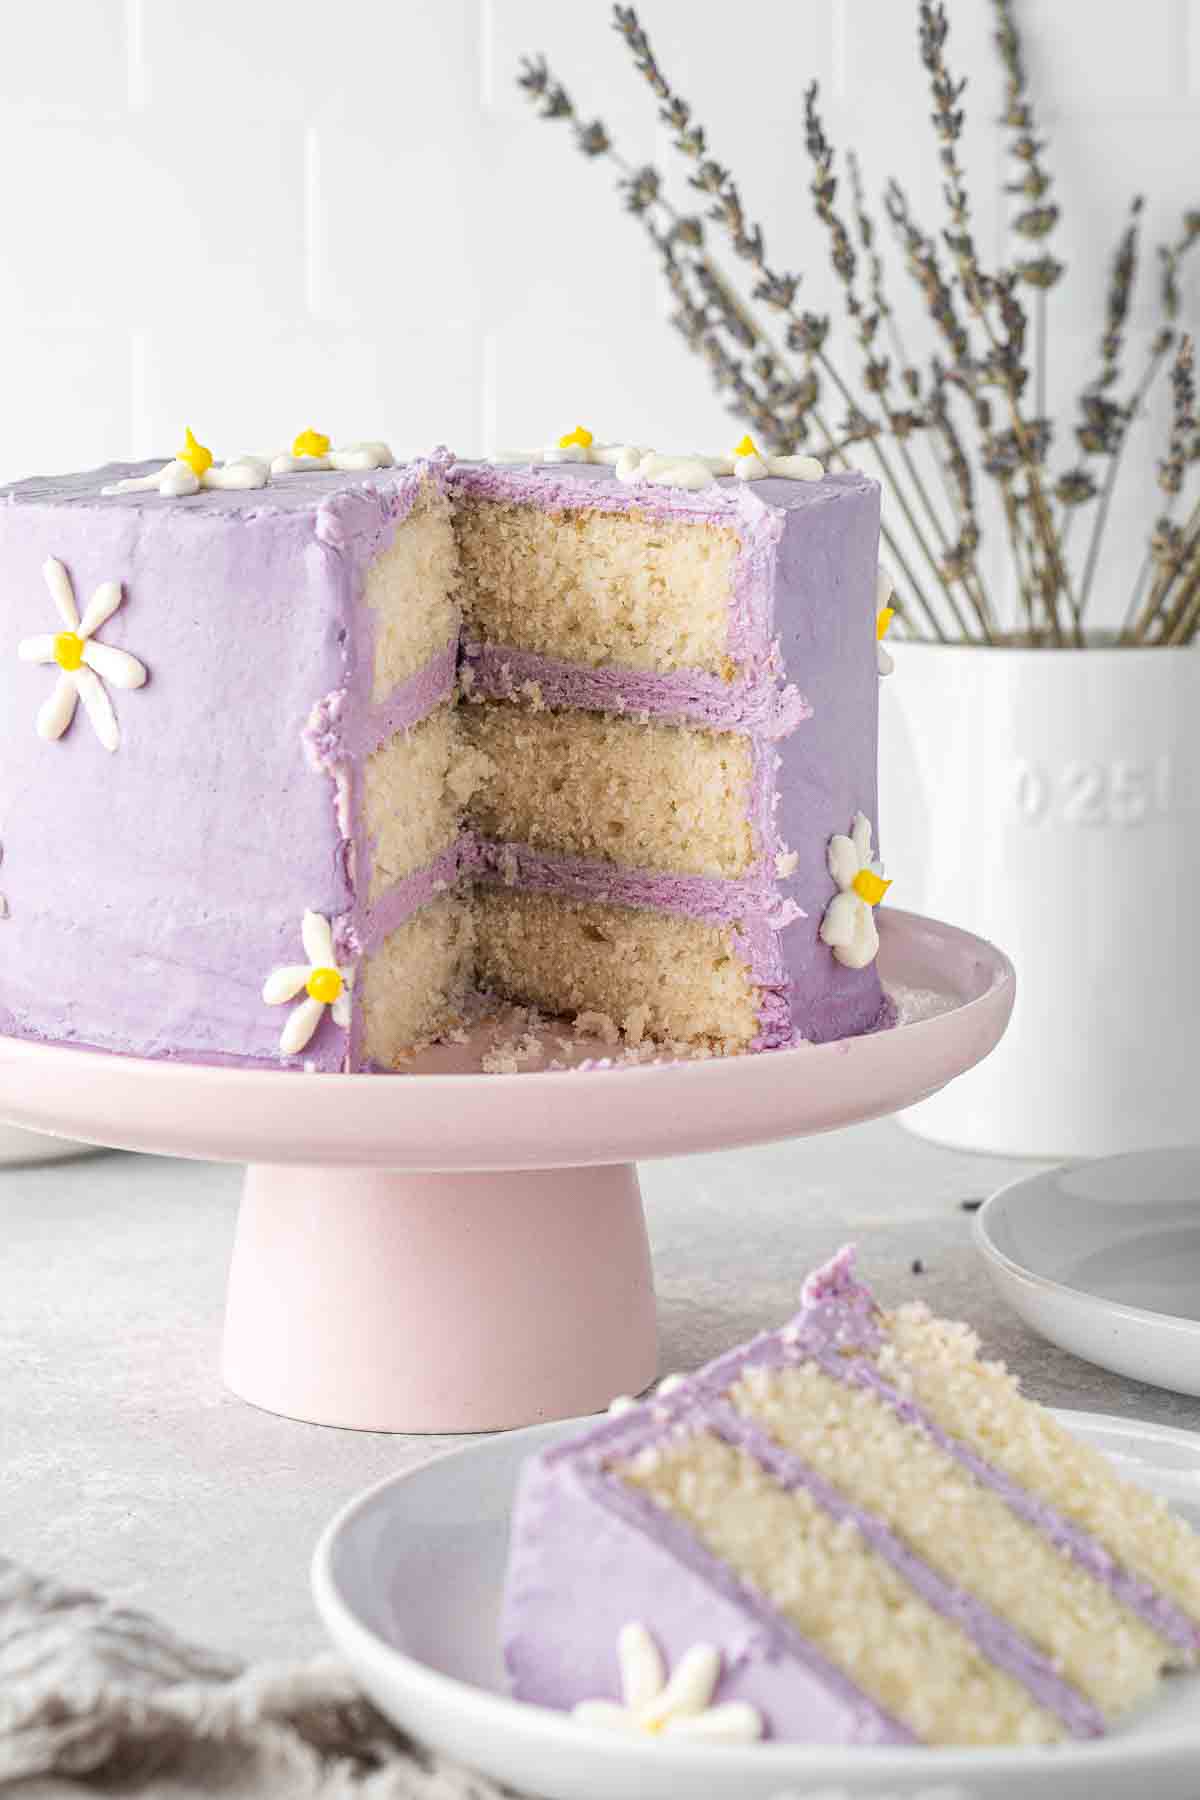
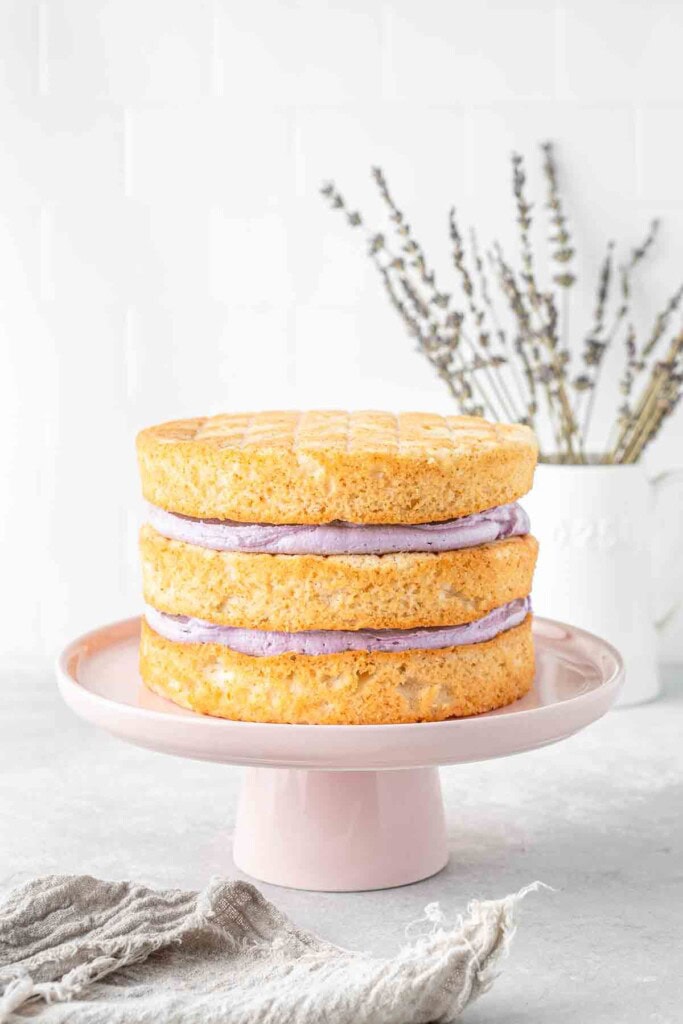
Once you’ve tinted the buttercream a soft lavender colour, it’s time to assemble the cake. Using your offset spatula, add a small dab of the buttercream onto the centre of a cake plate or stand and place down the first cake layer.
On top, spread some of the lavender buttercream, followed by the second cake layer upside down, more buttercream and the final cake, again upside down so the top of the cake is flat.
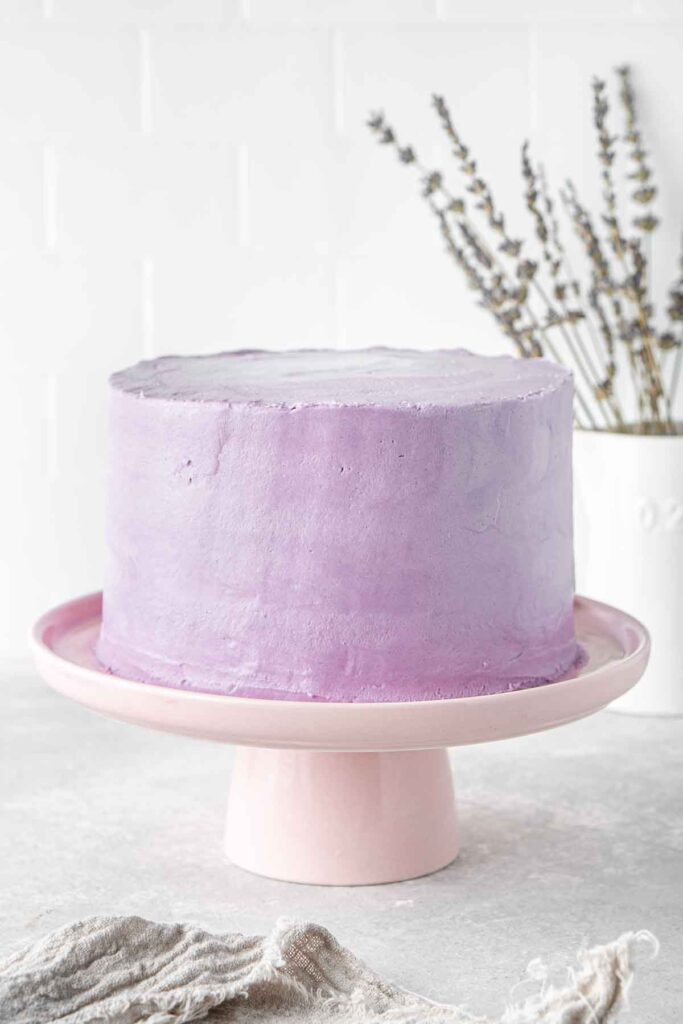
Use a piping bag with the tip cut off to add a layer of buttercream to the top of the cake and use your offset spatula to smooth it out. If some overlaps the sides, this is ok.
Use the piping bag to pipe more buttercream around the outside of the cake and smooth out with your spatula. Grab your cake scraper and smooth the sides of the cake as best you can. It’s ok if you can still see the cake through the buttercream as we’ll be adding another layer of buttercream.

Place the cake into the fridge to chill for 30-60 minutes before adding another layer of lavender buttercream, first to the top, then the sides, using your scraper to smooth out the sides.
You’ll notice excess buttercream forming on the top edges of the cake. This is essential to getting sharp edges on the top. Use your spatula to swipe the excess toward the centre of the cake. Repeat until you’re happy with the finish.
Remember cake decorating takes practise so be kind to yourself if it’s not perfect (mine certainly isn’t)! Once you’re happy with the finish, place the cake back into the fridge for another 30 minutes.
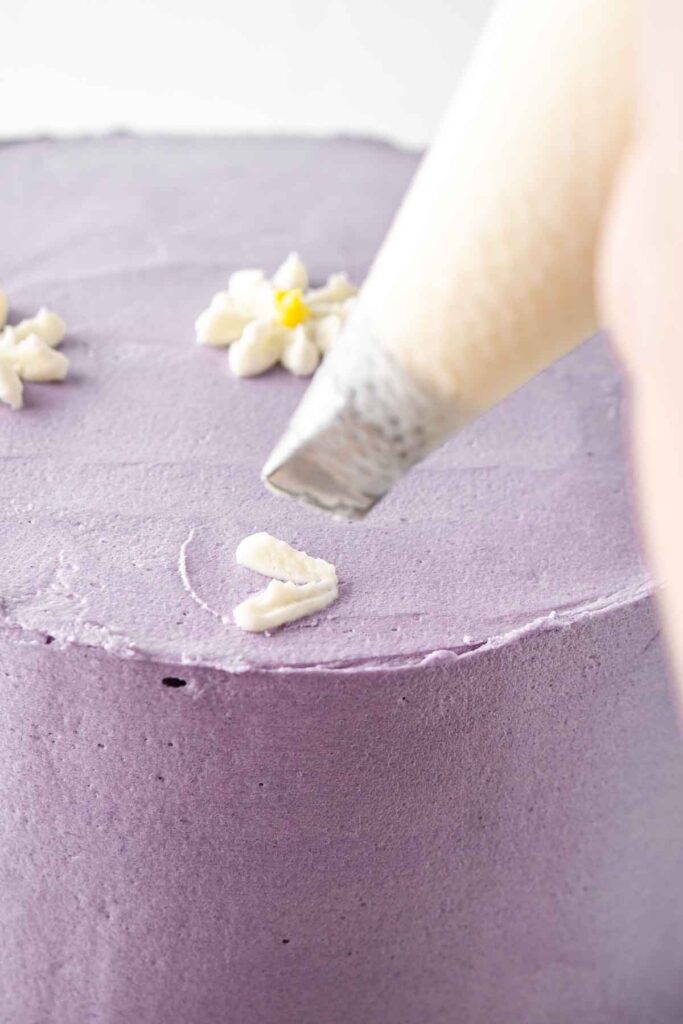
Meanwhile, get your equipment ready to pipe the buttercream daisies. Remove a quarter of the reserved white buttercream and place into a small bowl and add the yellow food colouring until you get a nice bright yellow colour.
Place the white buttercream into a piping bag with the Wilton 104 tip attached, and the yellow buttercream into another piping page with the Wilton 10 tip.
Hold the piping bag so that the 104 tip is parallel to the side of the cake with the larger part of the opening the outside tip of each daisy petal and the smaller part of the opening is the middle. Pipe petals in a circular motion to resemble a flower and then add dots of the yellow buttercream into the centre. Repeat and decorate the top and sides of the cake with as many daisies as you like.
Let the cake chill in the fridge for another hour before serving to ensure a nice clean cut.
Flavour Variations
If the lemon lavender combination isn’t for you but you love how cute this cake is, the good news is that you can use this decoration technique on a range of different flavours depending on what you’re looking for!
For the frosting you want something white so it can be tinted, so the best options would be:
And for the cake you can really use any flavour. The below cupcake recipes can be used to make a 3 layer 6 inch cake.
If you’re looking for a larger cake for your celebration, you can also use my vegan vanilla cake recipe which yields a 3 layer 8 inch cake which will serve 12-16 people.
I hope you have fun making this cute daisy cake and it brings a little brightness and joy to your next celebration!
If you do make this recipe, please be sure to leave a comment and ⭐⭐⭐⭐⭐ rating below! And tag any of your creations on Instagram with @eightforestlane as I would love to see.
More vegan layer cake recipes:
Vegan Biscoff Cake
Vegan Caramel Cake
Mini Vegan Chocolate Cake
Vegan Vanilla Cake

Vegan Daisy Cake
Equipment
Ingredients
For the vegan lemon cake:
- 1 ¾ cups plain flour/all purpose flour
- 1 teaspoon baking powder
- ¼ teaspoon bicarbonate of soda/baking soda
- ¾ cup white sugar/granulated sugar
- ⅓ cup canola oil
- 1 teaspoon vanilla extract
- zest of 1 lemon
- ¼ cup lemon
- ¾ cup dairy free milk
For the lavender buttercream:
- 1 tablespoon dried culinary lavender
- 2 tablespoon dairy free milk
- 180 grams dairy-free butter
- ½ teaspoon vanilla extract
- 4-5 cups icing sugar
- Pinch salt
- gel food colouring violet and yellow
Instructions
- Make the lemon cake: Preheat the oven to 180°C and line the base of three 6 inch round cake pans with baking paper and a light spray of cooking oil.
- In a medium bowl, sift flour, baking powder and bicarbonate of soda, and set aside.
- In a large mixing bowl, whisk together the white sugar, canola oil, vanilla, lemon zest and lemon juice until combined. Slowly add dry ingredients, alternating with the dairy free milk until the cake batter just comes together, being careful not to overmix.
- Divide the batter between the three prepared pans and place into the oven for 25 minutes or until the cakes are golden and the tops spring back when lightly touched. Allow the cakes to cool in the pan for 10 minutes before turning out onto a wire rack to cool completely. Place the cooled cakes in the freezer for 30-60 minutes to chill before assembling the cake.
- Make the lavender buttercream: Mix the culinary lavender with the dairy free milk and leave to infuse in the fridge for a minimum of 2 hours or overnight. Strain before using and discard the lavender, keeping the infused milk.
- Using a hand mixer or a stand mixer with the paddle attachment fitted, beat dairy-free butter and vanilla for 1-2 minutes until creamy. Add in 3 cups of icing sugar and beat on medium until combined. Add in an additional cup of icing sugar and continue to mix. As mixture thickens, add in the infused dairy free milk a little at a time until you reach a thick, creamy consistency. If the frosting is too thin or tastes too ‘buttery’, add in an extra ½-1 cup of icing sugar, and if it’s too thick, add a little bit more dairy free milk. Finally add a pinch of salt to taste.
- Remove approximately 1 cup of buttercream and set aside before adding a few drops of food colouring to the main batch to tint it a soft purple colour and mix until super creamy. Take ¼ of the reserved white buttercream and place in a small bowl with some yellow food colouring and mix well until you have a bright yellow colour.
- Assemble the cake: Start by placing the first cake layer on a plate or stand, using a small amount of buttercream to secure it. Spread lavender buttercream on top of the first layer, then add the second layer upside down. Repeat with more buttercream and the final layer, also upside down to make the top flat.
- Using a piping bag with the tip cut off, add buttercream to the top of the cake and smooth it with a spatula. Pipe more buttercream around the sides of the cake and use the spatula to smooth it out. Use a cake scraper to make the sides as smooth as possible. Chill the cake in the fridge for 30-60 minutes.
- Add another layer of lavender buttercream to the top and sides of the chilled cake to achieve a smooth result and complete coverage. Smoothing the outside of the cake with the scraper. Swipe excess buttercream from the top edges toward the centre of the cake to create sharp edges. Repeat until satisfied with the finish, then chill the cake for another 30 minutes before piping the daisies.
- Decorate the cake: Place the white buttercream into a piping bag with the Wilton 104 tip attached, and the yellow buttercream into another piping page with the Wilton 10 tip.
- Hold the piping bag so that the 104 tip is parallel to the side of the cake with the larger part of the opening the outside tip of each daisy petal and the smaller part of the opening is the middle. Pipe petals in a circular motion to resemble a flower and then add dots of the yellow buttercream into the centre. Repeat and decorate the top and sides of the cake with as many daisies as you like.
- Let the cake chill in the fridge for another hour to set the buttercream before serving to ensure a nice clean cut.
Notes
Nutrition
Nutritional information is provided as a guide only and is calculated using automated online tools, therefore we cannot guarantee the accuracy. We encourage you to make your own calculations based on the actual ingredients used in your recipe.

Never wonder what's for dinner again
Get a brand new dairy free meal plan every week, plus members only recipes and the whole of Eight Forest Lane with no ads. The planning is done, you just shop and cook.
Start your 7 day free trial →