
If you want to create bakery-style bread at home without spending hours in the kitchen, this overnight no-knead bread recipe is for you. It’s simple, forgiving, and gives you incredible soft, chewy loaves that are perfect for dunking in soups and stews, or making a classic avo toast. Let me show you just how easy it is!
One of the challenges I set myself this year was to finally master one of the key recipes I felt was missing from my repertoire – a simple homemade bread recipe!
With loaves of bakery-style bread costing upwards of $7 even from the supermarket, I knew the best thing for my budget was to learn how to make delicious bread at home. But I also knew that I wasn’t ready to dive into sourdough and commit to a starter.
So this overnight no knead bread is where we are. Inspired by a bunch of creators online over the years (including this one from Gimme Some Oven), this bread takes a little foresight but honestly, barely any effort.
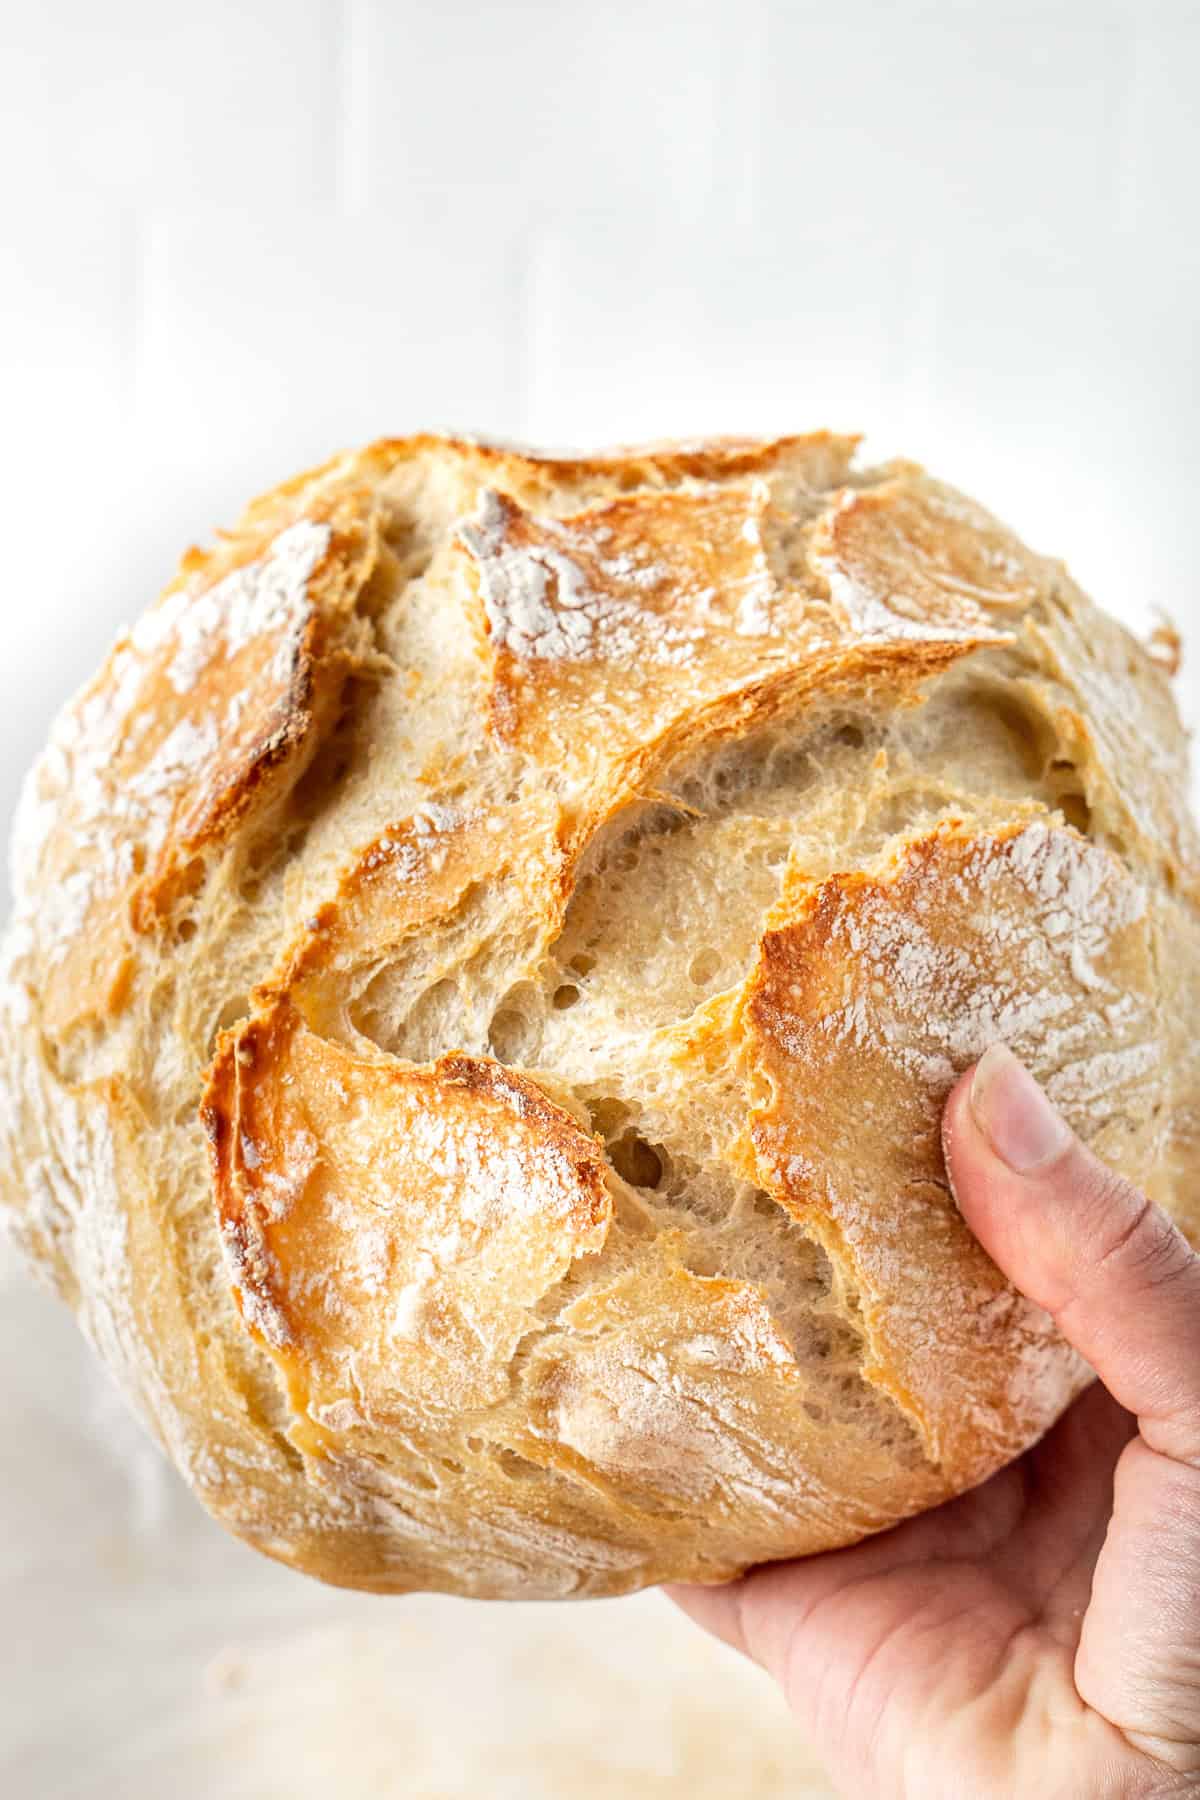
The result is soft, chewy, bakery-style bread that you made yourself. And I don’t have to tell you that there’s nothing better than freshly baked bread.
This is one of those recipes I’ve been working on behind the scenes for months, baking countless loaves and testing rise times and ingredient ratios to get the best result with the least effort. After all that trial and error, I can safely say this is a loaf you’ll want to make again and again and I’m so excited to share all my tips and tricks with you.
Key Ingredients
This no knead bread recipe is for those of us who just want something super simple using 3 pantry staple ingredients that we can always keep on hand.

Note all ingredients and their quantities are laid out in the recipe card at the bottom of this post.
- Plain flour – also known as all purpose flour in the US. I really wanted this recipe to be super accessible based on pantry staples, so we don’t need any special flours for this one.
- Salt – very important for the flavour of the bread. I use regular table salt again to keep this recipe using simple everyday ingredients.
- Yeast – dry yeast will allow the dough to rise and give it that bready taste and texture.
- Warm water – you want the water to be warm but not hot otherwise this will kill the yeast. If you can hold your finger in the liquid without it feeling uncomfortable, then that’s about perfect.
🤓Tip! Once a packet or jar of yeast is opened, it starts to lose its strength if left at room temperature. To keep it fresh and active for longer, store it in the fridge in an airtight container.
Step-By-Step Instructions
To make this no-knead bread, I recommend using a large container with a lid but you can also just use a large bowl and cover it with plastic wrap. You’ll also need a cast iron dutch oven with a lid for baking.
Step 1: Start by mixing all of the ingredients together in your container or bowl using a wooden spoon. The dough should be rough, shaggy and a little sticky. Start with 1 ½ cups of water and then add in a little more as you need it to get the right consistency.
Step 2: Once the dough comes together, place the lid on your container and set it aside at room temperature to rise. I usually just leave it on the kitchen counter.


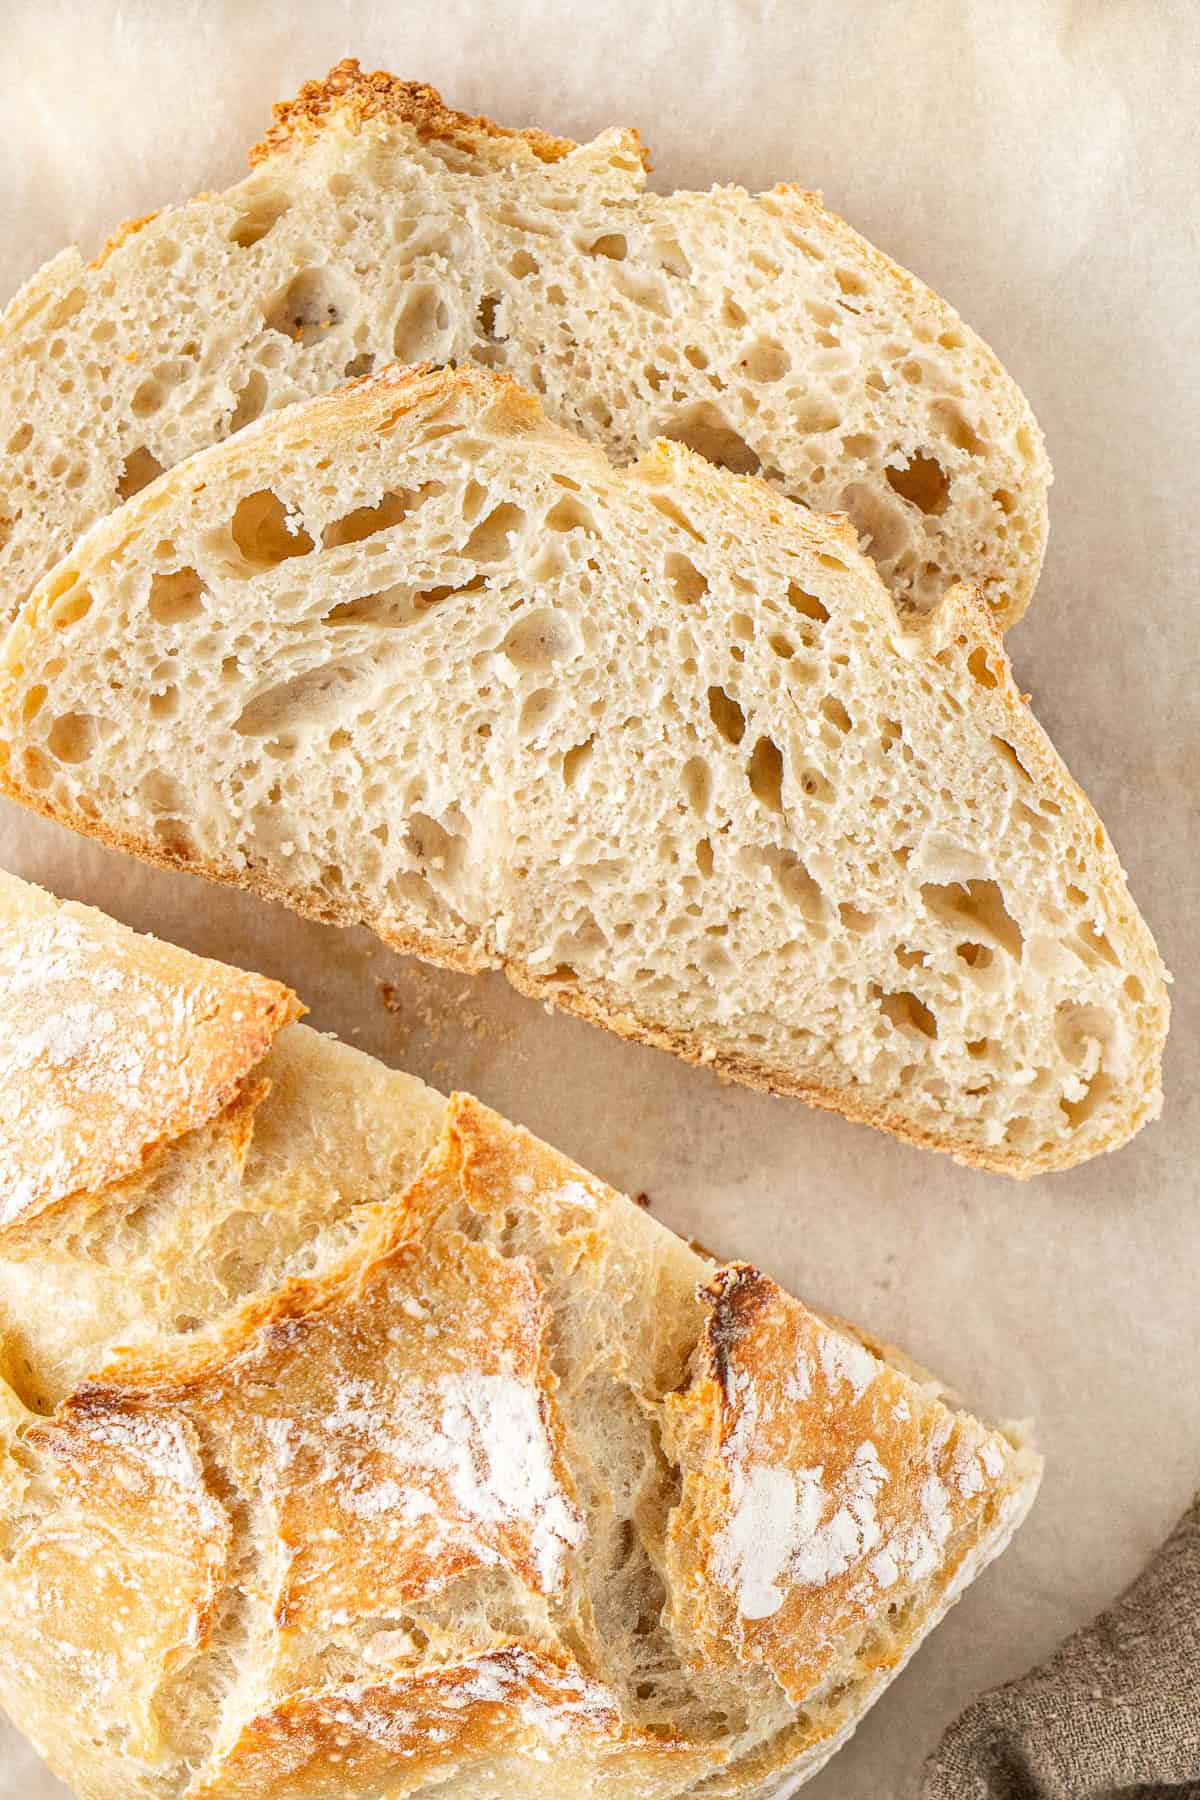
Rise Time: This is a slow rise bread so you’ll need to let it sit at room temperature for anywhere from 12-24 hours before baking. From my testing, I find the 18-20 hour mark ideal for the best rise (creating those beautiful big bubbles in the bread) and also for the best flavour.
The general rule of thumb is, the less yeast you use, the longer the dough needs to rise. This recipe uses just a small amount, which is why it’s left to rise overnight. A more traditional yeasted bread uses more yeast, so it only needs about an hour to rise.
Step 3: When you’re ready to bake, very gently turn the sticky dough out onto a lightly floured surface. Use your hand to gently fold the dough edges into the centre to create a ball. Add a little more flour if it’s too sticky. Remember this is a no-knead bread so the least amount of manipulation the better. Turn the ball over onto a piece of parchment paper so the smooth top is facing upwards.
Step 4: Cover the dough and set aside to rest for about 20-30 minutes while you preheat the oven. Place your dutch oven with the lid on into a cold oven and turn it to 230°C or 450°F.


Step 5: Once the oven is preheated, very carefully remove the lid of the pot and place the dough ball on the baking paper into the pot. If the dough has spread out a bit you can gently shape it back into a ball. Place the lid on the dutch oven and place in the oven for 30 minutes.
Step 6: Remove the lid of the dutch oven and continue to bake the bread for an additional 10-15 minutes or until the top is golden brown.
Step 7: Allow the bread to cool on a wire rack before slicing and serving. If you cut into it too early, it will be difficult to get nice even slices so I do recommend allowing it to cool completely but also I know that’s very difficult to do when it smells so good!

Serving Suggestions
There isn’t much that some freshly baked bread won’t improve, but here are a few of my favourite ways to use it;
- Use it to make a café quality avocado toast for breaky.
- Dunk it in tomato soup, pumpkin soup, potato and leek soup, minestrone soup or really any soup.
- Serve it with a slow cooked beef stew to soak up all the sauce.
- Toast it and serve topped with savoury mince.
- Make a chicken salad sandwich.
Recipe FAQs
Because the recipe uses a very small amount of yeast, the dough needs time to slowly ferment and develop flavour. The overnight rise also helps give the bread its open, chewy texture.
No knead dough is meant to be very wet and sticky as this is what helps create the airy, holey crumb. Lightly flour your hands and work surface to make it easier to handle.
Keep the loaf in a bread box, airtight container, or a paper bag at room temperature for 1-2 days. As there are no preservatives, this bread wont stay fresh much longer than this so for longer storage, slice the bread and freeze it in an airtight container or freezer bag.
I recommend using one as it really helps to create a crisp, golden crust and a soft, light middle. The heavy lid traps steam as the bread bakes, which works like a professional steam oven and gives that signature bakery-style texture.
My cast iron dutch oven is one of my most used items in my kitchen and you can get affordable options from Kmart, Aldi, TK Max or even Amazon. Just make sure they are rated for use in a high heat oven.

If you do make this recipe, please be sure to leave a comment and ⭐⭐⭐⭐⭐ rating below! And tag any of your creations on Instagram with @eightforestlane as I would love to see.
More simple bread recipes:
Vegan Naan
Olive and Herb Focaccia
Easy Pizza Dough Recipe
Pull-Apart Garlic Bread

Overnight No-Knead Bread
Equipment
Ingredients
- 450 grams (3 cups) plain flour/all purpose flour all purpose flour
- 1 ½ teaspoons salt
- ½ teaspoons yeast
- 1 ½ – 2 cups warm water
Instructions
- In a large bowl or container, stir together the 450 grams plain flour/all purpose flour, 1 ½ teaspoons salt, and ½ teaspoons yeast with a wooden spoon. Add 1 ½ – 2 cups warm water and mix until the dough is rough, shaggy, and a little sticky. Start with less water (1 ½ cups) and if it seems too dry, add a little more water, one tablespoon at a time, until it comes together.
- Cover the bowl with a lid or plastic wrap and leave it at room temperature on the kitchen counter. Let the dough rise slowly for 12-24 hours. For best results, aim for around 18-20 hours as this gives the bread the best bubbles and flavour.
- When you’re ready to bake, gently tip the dough onto a lightly floured surface. Using floured hands, fold the edges into the centre to form a rough ball. Be careful not to handle it too much. Place the dough seam-side down on a sheet of baking paper, with the smooth top facing up.
- Loosely cover the dough and let it rest for 20-30 minutes. While it rests, place a Dutch oven with its lid into a cold oven. Turn the oven on to 230°C (450°F) so both the pot and oven heat up together.
- Once the oven is hot, carefully take out the Dutch oven, remove the lid, and lift the dough (with the baking paper) into the pot. If the dough has spread, gently nudge it back into a ball shape. Cover with the lid and bake for 30 minutes.
- Remove the lid and bake for another 10-15 minutes, until the crust is golden brown.
- Transfer the bread to a wire rack and let it cool completely before slicing.
Notes
Nutrition
Nutritional information is provided as a guide only and is calculated using automated online tools, therefore we cannot guarantee the accuracy. We encourage you to make your own calculations based on the actual ingredients used in your recipe.


Never wonder what's for dinner again
Get a brand new dairy free meal plan every week, plus members only recipes and the whole of Eight Forest Lane with no ads. The planning is done, you just shop and cook.
Start your 7 day free trial →